Vermillion Insights
February 19, 2026 · Ken Vermeille · 21 min read
A Founder's Guide to Unit Test React with Jest
Ship with confidence. Learn how to unit test React components with practical Jest and Testing Library examples for startup teams focused on speed and ROI.

To unit test React, your toolkit really boils down to two heavy hitters: Jest as your test runner and React Testing Library for interacting with your components. This combination lets you spin up your components in a controlled environment and check that they behave exactly as a user would expect them to, saving you from endless manual checks. A practical insight here is to add a test script to your package.json, like "test": "jest --watch", so developers can run tests in watch mode for instant feedback as they code.
Why Unit Testing Is a Startup's Secret Weapon
When you're running a startup, speed is the name of the game. The pressure to ship fast is immense, but it often leaves you with a brittle codebase that slows you down just when you start to get traction. This is where a smart testing strategy isn't a chore - it's your secret weapon. It's about building a safety net that lets your team refactor, add features, and pivot without breaking everything.

The goal isn't 100% test coverage. Forget that. It’s about focusing your efforts where they'll give you the biggest bang for your buck.
Here’s why this actually matters to your business:
- Move Faster, with Confidence: When your core features have solid test coverage, developers can make changes without constantly looking over their shoulder. This directly fuels your team's velocity.
- Catch Bugs Before Your Users Do: Think of tests as your automated quality gate. They catch regressions before they ever hit production, protecting your reputation and saving you from frantic hotfixes.
- Naturally Better Code: Writing testable code forces developers into good habits, like creating smaller, more focused components. The result is a codebase that’s easier to maintain and scale.
- Signal a Mature Engineering Culture: A well-tested app is a massive green flag for investors. During due diligence for fundraising or an acquisition, it signals lower technical risk and a team that builds things to last.
The Modern Stack for React Testing
Today, the Jest and React Testing Library combo is the industry standard for a reason. Jest gives you a lightning-fast test runner with powerful mocking tools built right in. React Testing Library, on the other hand, pushes you to test behavior, not implementation details.
This philosophy is absolutely critical. Your tests shouldn't care how a component works on the inside; they should only care that it produces the right output for the user. Does the button do the thing? Does the error message show up? That's what matters.
This approach has quickly become foundational. Teams that have moved to modern runners like Jest or Vitest are seeing 30-40% faster test execution compared to older tools. For a startup, that translates to tighter feedback loops and more productive developers.
To give you a clearer picture, here’s a breakdown of the core concepts you'll be working with.
Table: Core Concepts in React Unit Testing
A quick overview of the key tools and philosophies for effective React unit testing.
| Concept | Why It Matters for Startups |
|---|---|
| Jest | A fast, all-in-one test runner. Less setup time means your engineers can focus on writing tests that matter, not on config. |
| React Testing Library | Promotes testing from the user's perspective. This ensures your app actually works for people, not just in theory. |
| User-Centric Testing | The philosophy of testing what the user sees and does. It makes your tests resilient to code refactors and implementation changes. |
| Mocking | Isolating components from external dependencies (APIs, analytics). This makes tests faster, more reliable, and focused. |
These aren't just technical terms; they're the building blocks of a development process that can keep up with your growth.
For founders, the core takeaway is this: Unit testing isn't about slowing down to write tests. It's about building a resilient product that can accelerate over time without accumulating crippling technical debt.
Ultimately, a solid testing practice is a key pillar of successful software development for startups. It aligns perfectly with the need for sustainable growth and agility, a theme we dive into deeper in our complete guide on https://vermillion.agency/insights/app-development-for-startups/.
By getting this foundation right, you're not just writing code - you're building a more valuable and dependable business asset.
Building a Production-Grade Testing Environment
Getting a basic unit test react setup running is easy, especially with boilerplate from tools like Create React App. But what happens when your codebase starts to grow? Pretty soon, you're wrestling with messy import paths, and tests start breaking because of missing global dependencies.
The default setup just doesn't cut it for a real, production-grade application. Let's build an environment that actually scales with you and keeps your team moving fast.
We're going to make three critical enhancements: getting Jest to play nice with TypeScript, cleaning up our imports with path aliases, and creating a global setup file to tame our mocks. These aren't just quality-of-life improvements; they're essential for maintaining velocity and test reliability.
Configuring Jest for TypeScript
If you're building a serious app, you're probably using TypeScript. The catch is that Jest runs on Node.js, which has no idea what to do with .ts and .tsx files out of the box. We need to bridge that gap, and that’s where ts-jest comes in.
First, let's get the dev dependencies installed:
npm install --save-dev jest ts-jest @types/jest
Next, create a jest.config.js file in your project's root. Don't cram this configuration into your package.json - giving it a dedicated file keeps things clean and organized as your setup gets more complex.
Here’s a solid starting point for that file:
// jest.config.js
module.exports = {
  preset: 'ts-jest',
  testEnvironment: 'jsdom',
  setupFilesAfterEnv: ['<rootDir>/src/setupTests.ts'],
};
Let’s quickly break this down:
- `preset: 'ts-jest'`: This is the magic bullet. It tells Jest to use
ts-jestto automatically handle all the TypeScript transformation for you. - `testEnvironment: 'jsdom'`: This simulates a browser-like environment in your tests, giving you access to the
windowanddocumentobjects. It’s absolutely essential for testing any React component that renders to the DOM. - `setupFilesAfterEnv`: This points to a file that Jest will run before each test suite. It's the perfect spot for any global setup, like custom matchers or mocks.
Taming Imports with Path Aliases
As your project grows, you’ll find yourself writing hideous import statements like import { Button } from '../../../components/common/Button'. They’re a nightmare to read, and they break every time you refactor a file.
Path aliases let you fix this, turning that mess into a clean, absolute import: import { Button } from '@/components/common/Button'.
To get this working, you need to teach both TypeScript and Jest how to resolve these paths.
First, update your tsconfig.json:
{
  "compilerOptions": {
    "baseUrl": ".",
    "paths": {
      "@/*": ["src/*"]
    }
  }
}
This tells the TypeScript compiler what @/ means. Now, we just need to give Jest the same instructions in jest.config.js using the moduleNameMapper option.
// jest.config.js
module.exports = {
  // ...other config
  preset: 'ts-jest',
  testEnvironment: 'jsdom',
  setupFilesAfterEnv: ['<rootDir>/src/setupTests.ts'],
  moduleNameMapper: {
    '^@/(.*)$': '<rootDir>/src/$1',
  },
};
This little bit of regex tells Jest to map any import starting with @/ to the corresponding file inside the src directory. It’s a small change with a massive impact on readability and maintainability. Honestly, making smart decisions like this early is a huge part of choosing a tech stack that helps you grow instead of holding you back.
Creating a Global Setup File for Mocks
Almost every app depends on some third-party script or global object - think analytics, feature flags, or payment SDKs. These will crash your tests because they don't exist in Jest's JSDOM environment. The solution is to mock them once in a global setup file.
A common source of test failures is an unmocked global dependency. By mocking dependencies like analytics or environment variables in a setup file, you ensure your tests are isolated, predictable, and focused only on the component's logic.
Let’s create that src/setupTests.ts file we referenced in our Jest config. This is where we can define mocks that will be available in every single test file.
// src/setupTests.ts
import '@testing-library/jest-dom';

// Mock a global analytics object
// This is a practical example for Segment or a similar analytics library.
window.analytics = {
  track: jest.fn(),
  identify: jest.fn(),
};

// Mock environment variables that your components might use.
process.env.REACT_APP_API_URL = 'https://api.mock.com';

// You could also mock browser APIs not present in JSDOM
Object.defineProperty(window, 'matchMedia', {
  writable: true,
  value: jest.fn().mockImplementation(query => ({
    matches: false,
    media: query,
    onchange: null,
    addListener: jest.fn(), // deprecated
    removeListener: jest.fn(), // deprecated
    addEventListener: jest.fn(),
    removeEventListener: jest.fn(),
    dispatchEvent: jest.fn(),
  })),
});
With this in place, every test will run in an environment where window.analytics.track() is a valid (mocked) function and process.env.REACT_APP_API_URL is safely defined. No more random test failures from external scripts. You can just focus on what matters: testing your component’s actual behavior.
Writing Your First Practical React Unit Tests
Okay, with the setup out of the way, it's time to actually write some tests. This is where the magic happens.
The core philosophy behind React Testing Library is deceptively simple but incredibly powerful: test your components the way your users experience them. Forget about implementation details. Forget about internal state. Focus on what the user sees and interacts with.
This approach makes your tests way more resilient. If you refactor a component's internals but the user-facing behavior stays the same, your tests should still pass. Let's get our hands dirty and see what this looks like in practice.

Testing a Simple UI Component
We’ll kick things off with a basic Alert component. Its only job is to show a message and change its style based on a status prop - a classic pattern for success or error feedback.
Here's the component itself:
// src/components/Alert.tsx
type AlertProps = {
  message: string;
  status: 'success' | 'error';
};

export const Alert = ({ message, status }: AlertProps) => {
  const baseClasses = 'p-4 rounded-md';
  const statusClasses = status === 'success' ? 'bg-green-100 text-green-800' : 'bg-red-100 text-red-800';

  return (
    <div role="alert" className={`${baseClasses} ${statusClasses}`}>
      {message}
    </div>
  );
};
Our mission is simple: make sure this component renders the message we give it and has the correct classes for accessibility and styling.
And here’s the test file that does just that:
// src/components/Alert.test.tsx
import { render, screen } from '@testing-library/react';
import { Alert } from './Alert';

describe('Alert', () => {
  it('should display the success message correctly', () => {
    // 1. Arrange: Pop the component onto the screen with our props.
    render(<Alert message="Profile updated successfully!" status="success" />);

    // 2. Act & Assert: Look for the message on the screen.
    const alertMessage = screen.getByText(/profile updated successfully/i);
    expect(alertMessage).toBeInTheDocument();

    // Actionable Insight: Also test the applied classes to ensure visual state is correct.
    expect(alertMessage).toHaveClass('bg-green-100');
  });

  it('should display the error message with correct styling', () => {
    render(<Alert message="Update failed. Please try again." status="error" />);
    const alertMessage = screen.getByText(/update failed/i);
    expect(alertMessage).toBeInTheDocument();
    expect(alertMessage).toHaveClass('bg-red-100');
  });
});
This test might look simple, but it's doing important work. We use render to get the component on the virtual screen, then screen.getByText to find an element with our message. If the message is found, the test passes. We've just confirmed our component works from the user's point of view.
Simulating User Interactions on a Stateful Component
Let's move on to something more dynamic: a Counter component with buttons to increment and decrement. Now we’re not just testing what’s rendered, but also how the component reacts when a user does something.
Here’s the Counter component:
// src/components/Counter.tsx
import { useState } from 'react';

export const Counter = () => {
  const [count, setCount] = useState(0);

  return (
    <div>
      <p>Count: {count}</p>
      <button onClick={() => setCount(count + 1)}>Increment</button>
      <button onClick={() => setCount(count - 1)}>Decrement</button>
    </div>
  );
};
To test this, we need to pretend we're a user clicking a button and then check if the count on the screen updates. This is exactly what fireEvent from React Testing Library is for.
// src/components/Counter.test.tsx
import { render, screen, fireEvent } from '@testing-library/react';
import { Counter } from './Counter';

describe('Counter', () => {
  it('should increment the count when the increment button is clicked', () => {
    render(<Counter />);

    // Find the button by its accessible name (the text inside it).
    const incrementButton = screen.getByRole('button', { name: /increment/i });
    const countDisplay = screen.getByText(/count: 0/i);
    expect(countDisplay).toBeInTheDocument();

    // Simulate a user clicking the button.
    fireEvent.click(incrementButton);

    // Assert that the count text has changed from 0 to 1.
    // Use `getByText` again to find the updated element.
    expect(screen.getByText(/count: 1/i)).toBeInTheDocument();
  });
});
Using getByRole is a great practice because it pushes you toward building more accessible apps. We find the button, click it, and then check that the DOM reflects the new state. Notice we’re testing the behavior, not peeking at the component's internal count variable.
This user-centric mindset is the whole game. A test that checks component.state().count is brittle; it's tied to implementation. A test that looks for "Count: 1" on the screen is resilient because it only cares about what the user sees.Writing a Test for a Custom Hook
Custom hooks are the bread and butter of modern React, letting us package up reusable logic. Testing them is a bit different since they don't render any UI directly. We need a way to "run" the hook and inspect what it returns.
For that, we'll bring in the renderHook function from React Testing Library. Let's test a simple useToggle hook.
Here’s the hook:
// src/hooks/useToggle.ts
import { useState, useCallback } from 'react';

export const useToggle = (initialState = false) => {
  const [state, setState] = useState(initialState);
  const toggle = useCallback(() => setState(s => !s), []);
  return [state, toggle] as const;
};
And here's how we can write a unit test react custom hook test:
// src/hooks/useToggle.test.ts
import { renderHook, act } from '@testing-library/react';
import { useToggle } from './useToggle';

describe('useToggle', () => {
  it('should toggle the state from false to true', () => {
    const { result } = renderHook(() => useToggle(false));

    // Check the initial state.
    expect(result.current[0]).toBe(false);

    // The 'act' utility makes sure all state updates are flushed before we continue.
    act(() => {
      result.current[1](); // Call the toggle function returned by the hook.
    });

    // Assert the new state is correct.
    expect(result.current[0]).toBe(true);
  });

  it('should toggle back to false on the second call', () => {
    const { result } = renderHook(() => useToggle(false));

    act(() => {
      result.current[1](); // First toggle: false -> true
    });
    act(() => {
      result.current[1](); // Second toggle: true -> false
    });

    expect(result.current[0]).toBe(false);
  });
});
The renderHook utility gives us a result.current object that holds the hook's return value. Any function call that causes a state update inside the hook needs to be wrapped in act() to ensure React processes everything before we move on to our assertions.
These examples cover the most common patterns you'll run into, giving you a solid launchpad for testing just about any part of your React application.
Mastering Mocks for Real-World Scenarios
Your React components rarely live in a vacuum. They talk to APIs, fire off analytics events, and pull state from global hooks. These outside connections - or dependencies - are the number one reason tests become slow, flaky, and frankly, a nightmare to maintain.
To properly unit test a React component, you have to isolate it. You do this by "mocking" these dependencies, swapping out the real things for predictable fakes that you control completely. This isn't optional; it's a non-negotiable skill for any team that wants to ship code without holding their breath.
When you don't mock dependencies, you're not writing unit tests anymore. You're writing fragile, slow integration tests that can break for reasons that have nothing to do with your component's code. Let's walk through three of the most common mocking scenarios I see every single day with startup teams.
Mocking API Calls with Jest
Picture a UserProfile component. When it mounts, it fetches user data from your backend. If you let it make a real network request in your test, you've already lost. The test will be slow, it will fail if the network is down, and it requires a live backend just to run.
Instead, we're going to use Jest's built-in tools to intercept that API call before it ever leaves the building.
Let's say you have a simple function for fetching data:
// src/services/api.js
export const fetchUser = async (userId) => {
  const response = await fetch(`https://api.yourapp.com/users/${userId}`);
  if (!response.ok) {
    throw new Error('Failed to fetch user');
  }
  return response.json();
};
To test a component that calls fetchUser, we'll tell Jest to mock the entire api.js module.
// src/components/UserProfile.test.js
import { render, screen, waitFor } from '@testing-library/react';
import { UserProfile } from './UserProfile';
import { fetchUser } from '../services/api';

// This one line tells Jest to replace the real module with a fake one.
jest.mock('../services/api');

describe('UserProfile', () => {
  it('displays the user name after a successful fetch', async () => {
    const mockUser = { id: 1, name: 'Alice' };
    // For this specific test, we'll tell our fake function what to return.
    fetchUser.mockResolvedValue(mockUser);

    render(<UserProfile userId="1" />);

    // Always good to check for the initial loading state.
    expect(screen.getByText(/loading/i)).toBeInTheDocument();

    // Now, we wait for the data to arrive and the component to re-render.
    const userName = await screen.findByText('Alice');
    expect(userName).toBeInTheDocument();
  });

  it('displays an error message if the fetch fails', async () => {
    // Actionable insight: Always test the unhappy path.
    const errorMessage = 'User not found';
    fetchUser.mockRejectedValue(new Error(errorMessage));

    render(<UserProfile userId="999" />);

    // Wait for the error message to be displayed.
    const errorElement = await screen.findByText(/error/i);
    expect(errorElement).toBeInTheDocument();
  });
});
Just like that, we have total control. We can simulate success with mockResolvedValue, force an error with mockRejectedValue, and test how our UI reacts to different data payloads. Our test is now blazing fast, completely reliable, and focused only on what the UserProfile component does.
Mocking a Third-Party Library
Startup life is all about integration. You're plugging in Stripe for payments, Segment for analytics, or any number of other SDKs. These libraries often work by injecting a script or adding an object to the global window. If you try to run a test without mocking them, it'll crash because those scripts and objects don't exist in Jest's Node.js environment.
Let’s imagine a CheckoutButton that uses a custom hook to interact with a payment SDK.
// src/components/CheckoutButton.js
import { usePaymentSDK } from '../hooks/usePaymentSDK';

export const CheckoutButton = ({ planId }) => {
  const sdk = usePaymentSDK();

  const handleClick = () => {
    sdk.startCheckout(planId);
  };

  return <button onClick={handleClick}>Upgrade Plan</button>;
};
The usePaymentSDK hook is the problem child here - it probably depends on something like window.PaymentSDK existing. We don't want to deal with that, so we'll just mock the entire hook.
// src/components/CheckoutButton.test.js
import { render, screen, fireEvent } from '@testing-library/react';
import { CheckoutButton } from './CheckoutButton';
import { usePaymentSDK } from '../hooks/usePaymentSDK';

// Mock the entire hook module.
jest.mock('../hooks/usePaymentSDK');

describe('CheckoutButton', () => {
  it('calls the SDK checkout function with the correct plan ID', () => {
    // We'll create our own fake SDK object with a spy function.
    const mockSdk = {
      startCheckout: jest.fn(),
    };
    // Then, we tell our mocked hook to return our fake object.
    usePaymentSDK.mockReturnValue(mockSdk);

    render(<CheckoutButton planId="pro-tier" />);

    const button = screen.getByRole('button', { name: /upgrade plan/i });
    fireEvent.click(button);

    // Finally, we check if our spy function was called as expected.
    expect(mockSdk.startCheckout).toHaveBeenCalledTimes(1);
    expect(mockSdk.startCheckout).toHaveBeenCalledWith('pro-tier');
  });
});
This is an incredibly powerful pattern. We've completely walled off our component from the real third-party library. The test's only job is to confirm that our component calls the SDK correctly; we trust that the SDK itself works.
Key Takeaway: Mocking isn't about ignoring your dependencies. It's about defining a clear, stable contract with them. Your test should verify that your component upholds its end of the contract, not that the dependency works.
Mocking React Hooks and Context
Finally, many of your components will depend on custom hooks that provide global state from React's Context API - think useAuth or useTheme. Trying to test these components in isolation, without providing that context, will just result in a screen full of red error messages.
Let's take a Header component that only shows a "Logout" button if a user is logged in, which it learns from a useAuth hook.
// src/hooks/useAuth.js
import { useContext } from 'react';
import { AuthContext } from '../context/AuthContext';

export const useAuth = () => useContext(AuthContext);
We can mock this hook directly to simulate both logged-in and logged-out states with zero fuss.
// src/components/Header.test.js
import { render, screen } from '@testing-library/react';
import { Header } from './Header';
import { useAuth } from '../hooks/useAuth';

jest.mock('../hooks/useAuth');

describe('Header', () => {
  it('shows the logout button for an authenticated user', () => {
    // Simulate a logged-in user.
    useAuth.mockReturnValue({ user: { name: 'Bob' }, isAuthenticated: true });

    render(<Header />);
    expect(screen.getByRole('button', { name: /logout/i })).toBeInTheDocument();
  });

  it('does not show the logout button for a guest', () => {
    // Simulate a logged-out state.
    useAuth.mockReturnValue({ user: null, isAuthenticated: false });

    render(<Header />);
    expect(screen.queryByRole('button', { name: /logout/i })).not.toBeInTheDocument();
  });
});
By mocking useAuth, we inject the exact state our component needs for each test case. This lets us verify every piece of conditional logic without the ceremony of wrapping our component in a real AuthProvider and managing its state. This is the kind of control you need to build a test suite that's both comprehensive and easy to maintain.
Solving Flaky Tests and Automating with CI/CD
Nothing kills a developer's confidence faster than a "flaky" test. You know the one - it passes, then fails, then passes again, all without a single code change. These tests are workflow killers. They clog up your pipeline, destroy trust in your test suite, and burn an unbelievable amount of time.
This isn't just a minor annoyance. Test flakiness is a massive challenge in the React world, with environment and resource issues causing a staggering 46.5% of all test failures. Think about it: a single flaky test can force a developer to rerun a suite multiple times, tacking on 15-30 minutes to every single dev cycle. For a small team, that time adds up fast, quietly burning hundreds of hours of productivity, a problem detailed in this deep dive into React testing challenges.
Fixing Flaky Tests Involving Async Operations
So, where does most of this flakiness come from? In my experience, the number one culprit is mishandling asynchronous operations. When a component fetches data, it re-renders after that API call finishes. If your test makes an assertion before that re-render happens, it fails. Simple as that.
I've seen so many tests use a fixed setTimeout or assert on a loading state without ever waiting for the final state to appear. That’s a recipe for disaster. Luckily, React Testing Library gives us exactly what we need to handle this properly: findBy queries and the waitFor utility.
Let's walk through a classic flaky test and see how to make it bulletproof.
The Flaky "Before" Example:
Picture a DataDisplay component. It starts by showing "Loading..." and then, after a quick fetch, it displays a message. A rookie mistake is to write a test that looks for the final message immediately.
// A FLAKY test - do not copy!
it('shows the final message (this might fail)', async () => {
  render(<DataDisplay />);

  // Problem: The assertion runs before the component has re-rendered with data.
  // It might pass on a fast machine but will fail in a slower CI environment.
  expect(screen.getByText(/Here is the data/i)).toBeInTheDocument();
});
This test is a race condition waiting to happen. It runs the assertion right away, while the component is almost certainly still showing its "Loading..." text. It's doomed to fail inconsistently.
The Reliable "After" Example:
Now, let's fix it. The secret is using an asynchronous findBy query. These are brilliant because they combine getBy with waitFor, patiently polling the DOM until the element appears (up to 1000ms by default).
// A RELIABLE test
import { render, screen } from '@testing-library/react';
import { DataDisplay } from './DataDisplay';

it('waits for and displays the final message', async () => {
  render(<DataDisplay />);

  // Solution: findByText returns a promise that resolves
  // when the element is found. The test will patiently wait.
  const messageElement = await screen.findByText(/Here is the data/i);

  expect(messageElement).toBeInTheDocument();
  // Actionable Insight: Also assert that the loading state is gone.
  expect(screen.queryByText(/loading/i)).not.toBeInTheDocument();
});
That one change - switching getByText to await screen.findByText - makes all the difference. The test now explicitly waits for the UI to settle into the state we actually want to verify. No more race conditions.
The diagram below shows the typical dependencies that introduce this kind of async behavior, like API calls and hooks, which demand careful management in your tests.
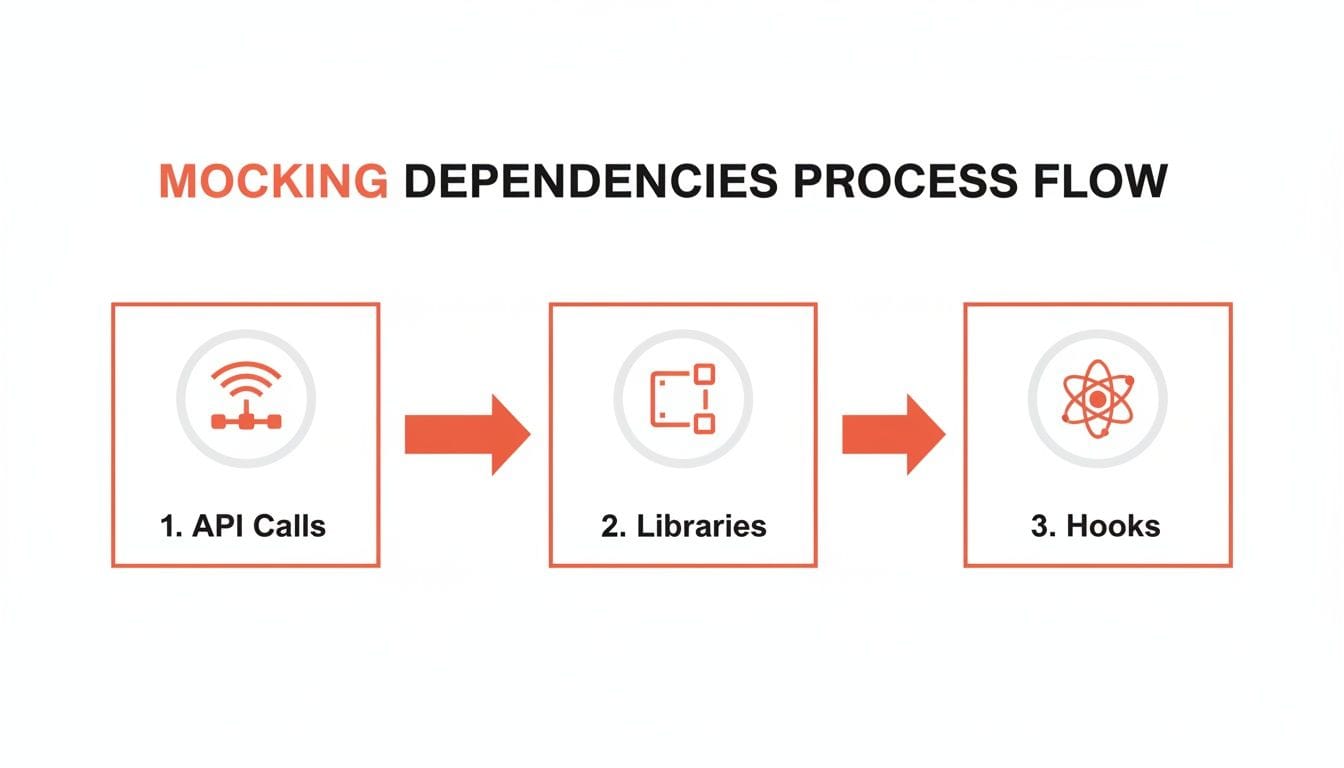
Whether it's network requests, third-party libraries, or custom hooks, the key takeaway is the same: isolate your component with mocks. It's the first and most critical step toward predictable, stable tests.
Automating Your Tests with CI/CD
Once your tests are stable and reliable, it’s time to put them to work. Running tests manually is a good start, but the real power comes from automation. Integrating your test suite into a Continuous Integration/Continuous Deployment (CI/CD) pipeline creates an automated quality gate. It’s your safety net, ensuring that no code that breaks existing features can ever be merged.
GitHub Actions is a fantastic, no-fuss way to get this done. All you need is a simple YAML file in your repository, and you can have a workflow running your test suite on every single pull request.
Here’s a practical, plug-and-play configuration. Just create this file at .github/workflows/ci.yml:
# .github/workflows/ci.yml
name: React CI

on:
  pull_request:
    branches: [ main, develop ]

jobs:
  test:
    runs-on: ubuntu-latest

    steps:
      - name: Checkout code
        uses: actions/checkout@v3

      - name: Setup Node.js
        uses: actions/setup-node@v3
        with:
          node-version: '18'
          cache: 'npm'

      - name: Install dependencies
        run: npm ci

      - name: Run tests
        # The --ci flag is optimized for CI environments
        # --coverage generates a report, and --watch=false prevents hanging
        run: npm test -- --ci --coverage --watch=false
This workflow is configured to run on any pull request targeting your main or develop branches. It checks out the code, uses npm ci for a clean and reproducible dependency install, and then runs npm test. If even a single test fails, GitHub will physically block the PR from being merged.
This kind of automation is a foundational practice, especially when you start implementing Agile and DevOps for enterprises. It’s how you build a culture of quality without slowing anyone down.
Theory is one thing. Actually shipping a product is another.
When you're in the trenches, the abstract concepts of testing give way to hard, practical questions. Founders and developers don't have time for academic debates; they need answers that respect their most limited resource - time. So let's skip the fluff and get right to the questions that actually come up in a fast-moving startup.
What Is a Realistic Test Coverage Goal?
Chasing 100% test coverage is a classic founder trap. It’s a vanity metric that feels productive but often leads to writing low-value tests for simple components, burning precious engineering hours for almost no gain.
A much smarter approach for an early-stage company is to aim for 70-80% coverage, but only on your critical user flows.
So, what’s a "critical flow"?
- Authentication: Your sign-up, login, and password reset journeys. If users can't get in, nothing else matters.
- Core Value Prop: The main feature your users are paying for. For an analytics app, it’s the dashboard. For a fintech app, it’s the transaction screen.
- Payment and Subscription Logic: Anything that touches money needs to be bulletproof. One bug here can kill your reputation.
The rule is simple: aim for high coverage on code that, if it breaks, loses you money or users. A single test on a complex pricing calculation is worth more than ten tests on a static marketing page. Start there and let coverage on less critical areas grow over time.
This targeted approach gives you a safety net where it counts most, freeing up your team to move fast and break things on the less sensitive parts of the app.
Unit Tests vs. End-to-End Tests: When to Use Each
This is a huge point of confusion, but the distinction is simple and essential for spending your time wisely. They serve two totally different purposes.
- Unit Tests are for isolation. They check if one single component, hook, or function works correctly on its own. Think of them as quality control on an assembly line. They're fast, cheap to write, and perfect for verifying individual pieces of logic. Use them to answer questions like, "Does this button become disabled when the form is invalid?"
- End-to-End (E2E) Tests are for integration. They simulate a real user's entire journey through the app, from logging in to completing a key task. They’re slower and more brittle, but they confirm that all the individual pieces you unit-tested actually work together in the real world. Use them to verify critical paths like, "Can a new user successfully sign up, create a project, and invite a teammate?"
A healthy testing strategy is a mix. You should have a ton of fast unit tests covering your component logic - they give developers instant feedback. Then, layer on a small, hand-picked suite of E2E tests that cover the absolute most critical, multi-step workflows.
How Do I Start Testing an Existing Project with Zero Coverage?
Staring down a big, untested codebase is a nightmare. The impulse is to plan a massive "testing sprint" to fix it all at once, but that's a recipe for burnout and failure. You have to be more strategic.
The "Boy Scout Rule" is your best friend here: always leave the code cleaner than you found it.
Here’s the game plan:
- Test New Code First. Draw a line in the sand. From this day forward, any new feature or component must have tests. This immediately stops the bleeding and prevents you from digging a deeper hole.
- Add Tests When Fixing Bugs. Whenever a bug gets reported, the very first step is to write a failing test that reproduces it. Then you fix the code to make the test pass. This guarantees the bug is squashed for good.
- Prioritize High-Risk Areas. You know which parts of your app are the scariest. The complex, buggy, or business-critical modules. The next time a developer has to touch one of those areas, require them to add at least a few basic tests to improve its stability.
This approach is so much more sustainable. It gradually builds your test coverage over time, focusing your effort on the parts of the app that are actively changing or causing problems - which is exactly where you'll get the highest return on your time.
At Vermillion, we partner with founders to build scalable, resilient products by embedding these exact practices into their development lifecycle. We help you make the right technical decisions - from architecture to testing strategies - that protect your momentum and ensure what you build today can support your growth tomorrow. If you need a technical partner who brings both senior judgment and hands-on execution, learn more about how we can help at vermillion.agency.
Keep reading
See all →
March 22, 2026
Unlocking Revenue Your Guide to Price Tier Strategy

March 21, 2026
Your Guide to Flawless Stripe Subscription Management

May 14, 2026
Fractional Mobile Engineering vs. Full-Time Hiring in 2026
The mobile engineering talent market has shifted dramatically over the past two years. Budgets are tighter, AI tools have changed what a sin...
March 20, 2026
Recurring Billing With Stripe a Guide for Subscription Apps
Master recurring billing with Stripe. This guide covers everything from setup and server logic to webhooks and churn reduction for subscript...

March 19, 2026
Unlocking Growth with Mobile App Retention Metrics
Discover the mobile app retention metrics that directly fuel MRR growth. This founder's guide offers actionable strategies to track, analyze...