Vermillion Insights
March 21, 2026 · Ken Vermeille · 20 min read
Your Guide to Flawless Stripe Subscription Management
Master Stripe subscription management with this guide for React Native teams. Learn to build, scale, and automate your billing system with expert tips and code.
Getting your Stripe subscription management right isn't just a backend chore. It's the engine room for your app's growth. We're talking about the entire lifecycle - from the moment a user signs up and gets billed, to how they handle upgrades, and eventually, if they cancel. For any subscription app, mastering this is how you test monetization, slash churn, and actually grow customer lifetime value.
Why Smart Subscription Management Drives Growth

I've seen this happen over and over, especially with marketing-savvy founders. You have a dozen brilliant ideas for A/B testing your paywall, trying out new pricing tiers, or tweaking your onboarding. The problem? Engineering becomes a bottleneck. Your ambition to iterate on monetization outpaces the team's ability to ship code.
This is where you need to stop thinking of Stripe as just a payment processor. It's a growth engine in disguise. With a solid Stripe architecture, you can decouple most of your monetization experiments from your core application code, giving you the speed you need to actually compete.
Bridge the Gap Between Marketing and Engineering
The real problem usually boils down to how billing logic is coded. If every price change, trial extension, or discount code requires a fresh code deployment and another round of app store reviews, your growth experiments are dead on arrival.
A well-designed Stripe integration pushes this logic server-side.
This small shift empowers your marketing and product teams to run tests without begging for engineering time. Practical example: Imagine you want to test a "25% off for 3 months" offer to win back canceled users. Instead of coding this logic into your app, you create a coupon directly in your Stripe dashboard. Your backend can then apply this coupon via the API when a user clicks a "Resubscribe with offer" button, without needing a new app release. That kind of agility is a complete game-changer. If you want to dig deeper, you might be interested in exploring more about the right subscription billing software for your needs in our detailed guide.
A classic mistake is hard-coding plan features and prices directly into the mobile app. The right way is to fetch this from your own backend, which treats Stripe as the "source of truth" for all your subscription offers.
This shift directly juices your key business metrics. It lets you pivot fast based on market demands and what your customers are telling you - something essential for any kind of sustainable growth. It's no accident that companies like Figma and OpenAI use Stripe Billing to run incredibly complex revenue models; it’s built for this kind of flexibility.
Boost Core Metrics with a Better Architecture
A thoughtful Stripe subscription management strategy isn't just about clean code; it directly pumps up your most important KPIs. Let’s get practical.
- Increased LTV: Make it dead simple for users to upgrade from monthly to annual, or to jump to a higher tier. Actionable insight: When a user is on a monthly plan, display a clear, one-click "Switch to Annual & Save 20%" button in your app's settings. When clicked, your backend triggers the Stripe subscription update with proration, and the user instantly sees the savings. When you handle prorations correctly, the experience feels fair and transparent, which actually encourages those valuable upgrades.
- Reduced Churn: Stripe’s built-in dunning tools, like Smart Retries, can automatically recover a huge chunk of failed payments from expired cards or temporary fund issues. Actionable insight: Enable Smart Retries in your Stripe Billing settings. Then, customize the dunning emails to match your brand's voice and include a direct link to your Customer Portal, making it effortless for users to update their card. This cuts involuntary churn without a single minute of manual work from your team.
- Higher Engineering Velocity: When your billing system just works, your engineers are freed up from chasing down payment ghosts. They can get back to building the core product features that keep users around, instead of spending sprints on billing maintenance.
When you start seeing Stripe as a core part of your growth stack instead of just a transactional tool, you unlock the speed and flexibility to outmaneuver everyone else. This is especially true for marketing-first teams who live and die by their ability to test and learn.
Building Your Subscription Foundation in Stripe
While it's tempting to start by clicking around in the Stripe Dashboard, any team serious about growth will outgrow that approach fast. Relying on manual entries for your products and prices is a ticking time bomb. It works when you have one or two plans, but the moment your business needs to test a new price, launch a yearly discount, or add a new feature tier, the friction becomes unbearable.
The only scalable way forward is to treat your product catalog as code. This means defining every product and price programmatically through the API. It’s the foundation that lets you iterate on your business model as quickly as you can come up with ideas, without getting bogged down in manual admin work.
This API-driven model is the bedrock of an adaptable billing system. For a deeper dive into getting this core infrastructure right, this founder's guide to the Subscription API Stripe is a fantastic resource I often recommend.
Modeling Products and Prices with the API
The key concept to grasp is the separation between a Product and a Price in Stripe. Think of a Product as the what - it's your "Pro Plan" or "Basic Tier." A Price, on the other hand, is the how much and how often a customer pays for that product.
This distinction is incredibly powerful because a single Product can have many different Prices. For example, your "Pro Plan" Product could be linked to several Price objects:
- A recurring monthly price: $29/month
- A recurring annual price: $290/year (with a built-in discount)
- A special promotional price for a limited-time campaign
This structure gives you enormous flexibility without creating a messy product list. You can run pricing experiments, offer different billing cycles, and support multiple currencies, all while keeping your core "Pro Plan" Product clean and consistent.
Here’s what that looks like in practice. This Node.js snippet creates a new "Premium Plan" and attaches a recurring monthly price. It’s a simple, repeatable way to define your offerings.
// Make sure you've installed the Stripe Node.js library:
// npm install stripe

const stripe = require('stripe')('your_secret_key');

// First, you define the Product itself
const product = await stripe.products.create({
  name: 'Premium Plan',
  description: 'Access to all premium features and priority support.',
});

// Then, you create a specific Price for that Product
const price = await stripe.prices.create({
  unit_amount: 4900, // This is $49.00, specified in cents
  currency: 'usd',
  recurring: {
    interval: 'month',
  },
  product: product.id, // Link the price back to the product
});

console.log(`Successfully created Product: ${product.id} and Price: ${price.id}`);
Taking this API-first approach from day one makes your entire billing system programmable, testable, and ready to scale with your app.
Using Metadata to Sync Your App with Stripe
One of the most powerful, and often overlooked, features in Stripe is metadata. It's a simple key-value store available on most Stripe objects - Products, Prices, Subscriptions, you name it. This is the secret to making Stripe your single source of truth for billing and entitlements.
Instead of creating a separate "features" or "permissions" table in your own database to track what each plan gets, you can embed that logic directly into the Stripe Price object's metadata.
Pro Tip: Never hard-code feature access in your application code. I've seen teams spend weeks untangling this mess. By storing entitlements in Stripe's metadata, you can change what a plan includes with a simple API call - no new code deployment required.
For instance, when creating the price for your "Premium Plan," you can attach metadata that defines exactly what that plan gives a user:
const price = await stripe.prices.create({
  unit_amount: 4900,
  currency: 'usd',
  recurring: { interval: 'month' },
  product: 'prod_premium_plan', // The ID of your Premium Plan Product
  metadata: {
    features: 'advanced_analytics,priority_support,unlimited_projects',
    tier_level: 'premium'
  }
});
Now, when a user successfully subscribes, your webhook handler listening for invoice.payment_succeeded can read this metadata directly from the subscription's price object. Your backend then parses the features string and updates the user's permissions in your application's database.
Decide to add a new "beta_access" feature to the Premium plan later? Just update the metadata on that Price object. All new subscribers will automatically get it. This simple pattern solves a huge headache for engineering teams by eliminating data drift between your app and your billing system. What a customer pays for is exactly what they get. Period. This makes your entire Stripe subscription management far more resilient and so much easier to maintain.
Once you’ve nailed down your products and pricing in Stripe, the real engineering work begins. This isn't just about charging a credit card; it’s about coding the entire subscription lifecycle, from the moment a user signs up for a trial to the day they decide to upgrade, downgrade, or even cancel.
A great subscription system feels invisible to the user but is fully automated on the backend. It has to gracefully handle all the messy, real-world scenarios - like a user changing their plan mid-cycle or offering a last-minute discount to someone about to churn. This is the engine that actually powers your business model.
We follow a simple, repeatable process for every change to a subscription. It boils down to three core steps.
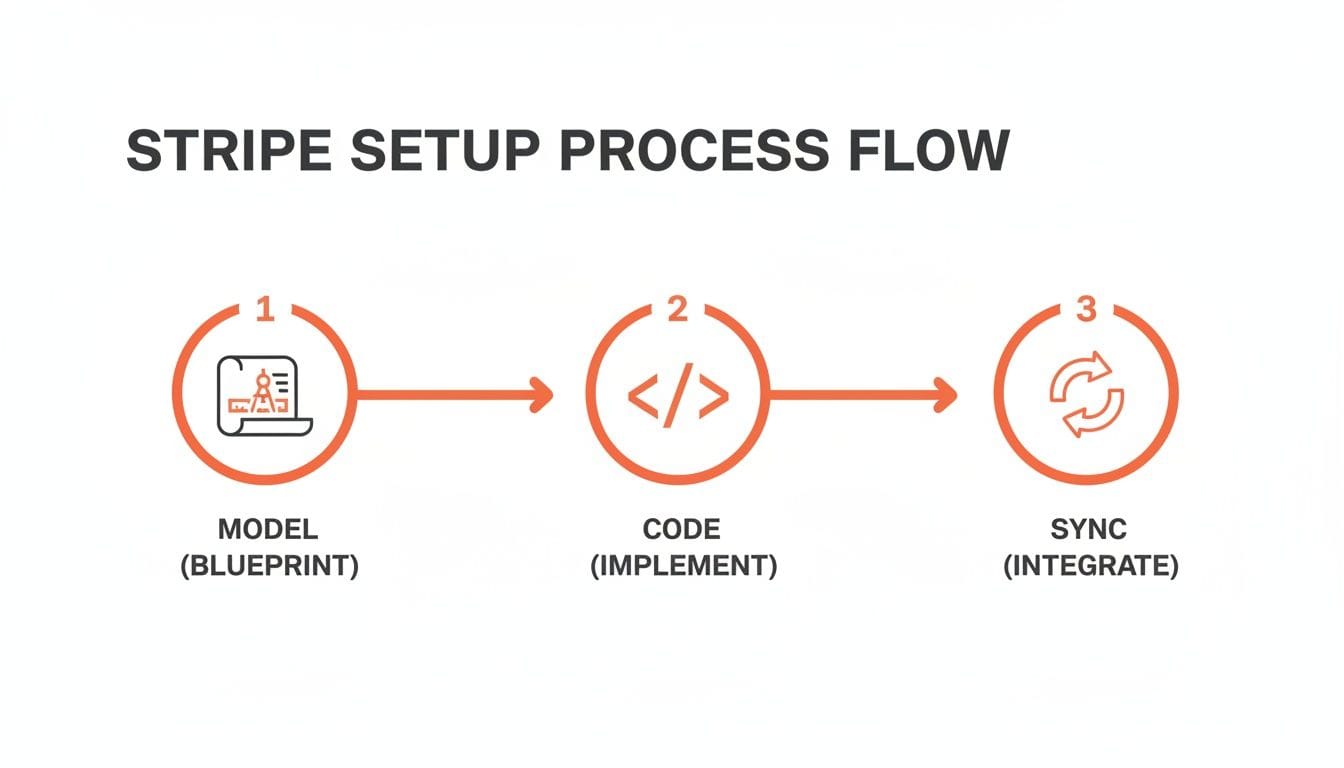
This Model, Code, Sync flow is the fundamental pattern for building a Stripe integration that doesn't break. It ensures your app's internal state always matches what’s actually happening with the customer's billing.
Creating New Subscriptions and Trials
The front door for most new customers is creating a subscription, and the best way to get them in the door is often with a free trial. It lets them see the value of your app firsthand before pulling out their wallet.
With Stripe, you can attach a trial period right when you create the subscription. Stripe then handles the logic of waiting to send the first invoice until the trial is over.
Here’s a real-world example of creating a subscription for a new customer with a 14-day trial for a "Pro Plan." This code would run on your server after a user action in your app.
// Assumes you have a Stripe Customer ID and the Price ID for the plan
const subscription = await stripe.subscriptions.create({
  customer: 'cus_xxxxxxxxxxxxxx',
  items: [
    {
      price: 'price_pro_monthly', // Your Price ID from the Stripe Dashboard
    },
  ],
  trial_period_days: 14,
});
That’s it. Stripe now knows to wait 14 days before attempting the first charge. Your job is to build a webhook listener for the invoice.payment_succeeded event to confirm the trial converted successfully, then grant them full access in your database.
Handling Upgrades and Downgrades with Proration
This is where many homegrown billing systems fall apart. A user on a $10/month plan decides to upgrade to a $30/month plan halfway through their billing period. How do you charge them fairly without manual intervention?
The answer is proration, and Stripe handles it brilliantly.
When you update a subscription, you can tell Stripe to automatically calculate the difference. It figures out the value of the unused time on the old plan, credits it, and immediately invoices the customer for the prorated cost of the new plan.
Proration is a critical trust signal. When users see a fair, transparent charge for an upgrade, it reinforces their confidence in your service. Getting this right is non-negotiable for a good user experience.
Imagine a user wants to switch from a monthly plan to an annual one to get a discount. You need to give them credit for the unused part of their current month and apply it to the new, larger annual charge.
Here’s how you’d manage that upgrade in your code:
- First, you need the user's current subscription object to get the ID of the specific item they are changing.
- Then, you call the
subscriptions.updateendpoint, swapping the old price ID for the new one and telling Stripe how to handle the proration.
// Retrieve the subscription to get the subscription item ID
const subscription = await stripe.subscriptions.retrieve('sub_xxxxxxxxxxxxxx');
const subscriptionItemId = subscription.items.data[0].id;

// Update the subscription to the new annual price with proration
const updatedSubscription = await stripe.subscriptions.update('sub_xxxxxxxxxxxxxx', {
  items: [{
    id: subscriptionItemId,
    price: 'price_pro_annual', // The Price ID for your Pro annual plan
  }],
  proration_behavior: 'create_prorations',
});
Setting proration_behavior to create_prorations tells Stripe to generate an immediate invoice for the difference. It's the most common and user-friendly approach. Downgrades work the same way but typically result in a credit being added to the customer's balance, which will be applied to future invoices.
Advanced Lifecycle Management Tactics
A mature subscription system does more than just create and update. It actively works to reduce churn and retain customers.
Two powerful tactics you can implement are pausing subscriptions and offering retention discounts.
- Pausing Subscriptions: Instead of forcing a user to cancel, let them pause. This is perfect for customers who might be taking a temporary break but intend to come back. Practical Example: When a user clicks "Cancel," present them with a "Pause for 3 months" option. If they select it, your backend makes a single API call to Stripe's
pause_collectionfeature. The subscription remains active but billing stops, keeping the customer in your ecosystem. - One-Time Discounts: When a user clicks the "Cancel Subscription" button in your app, don't just let them go. You can trigger an API call that programmatically applies a one-time coupon to their subscription as a last-ditch retention offer, like "Get 50% off your next 3 months."
These features show just how deeply Stripe understands the subscription economy. Its API isn’t just for payments; it's a toolkit for growth and retention. This is why its adoption is so widespread - powering over 300,000 companies and aligning with a market projected to hit $37.36 billion by 2035, as detailed in reports on Stripe's statistics.
At Vermillion, it's the same reason we use Stripe Billing for our retainer clients. It lets us automate these complex lifecycle events and rapidly experiment with different paywall and retention strategies without reinventing the wheel.
Automating Billing with Webhooks and Dunning

If you're still manually checking for failed payments or updating user accounts, you're killing your growth. A truly resilient subscription app doesn't need a human in the loop for routine billing tasks. It just works.
This kind of automation rests on two pillars: webhooks and dunning. Get these right, and you'll build a system that practically runs itself.
Think of webhooks as the central nervous system of your Stripe integration. They're automated notifications Stripe sends to your server when something important happens - a payment succeeds, a subscription is canceled, a card fails. Without them, your app is flying blind, completely unaware of your customer's current subscription status.
Securely Handling Critical Webhook Events
Your first move is setting up a dedicated endpoint on your server - a URL where Stripe can send these event notifications. This absolutely must be secure. Stripe signs every webhook request, and the very first thing your endpoint should do is verify that signature. This simple step is non-negotiable; it prevents anyone from sending fake events to your server and wreaking havoc on your user data.
Once secured, you have to decide which events to actually listen for. While Stripe fires off hundreds of different event types, you only need to master a handful to build a rock-solid subscription backend.
When we audit subscription apps, we often find a common mistake: the backend only listens for invoice.payment_succeeded. This is dangerously shortsighted. Your system needs to handle failures, disputes, and cancellations with the same automated precision as it handles successful payments.
Here’s a look at the webhook events you absolutely must handle to keep your subscription data accurate and your app responding correctly to billing changes.
Essential Stripe Webhook Events for Subscription Apps
| Webhook Event | What It Means | Actionable Insight for Your Backend |
|---|---|---|
| `invoice.payment_succeeded` | The user's payment went through successfully. | This is your green light. Update your database to set the user's `subscription_expires_at` date to the new period end. Grant or confirm access to paid features. |
| `invoice.payment_failed` | A payment attempt failed (e.g., insufficient funds, expired card). | This is your first warning of potential involuntary churn. Trigger an in-app notification and email asking the user to update their payment method. Action: Your code should set a flag like `user.status = 'past_due'`. |
| `customer.subscription.deleted` | The subscription has been officially canceled, either by the user or after all dunning attempts failed. | This is the final word. Your backend's action is clear: immediately revoke the user's access to all paid features in your database. Action: Set `user.access_level = 'free'` in your database. |
| `customer.subscription.updated` | Any change to the subscription, including upgrades, downgrades, or trial modifications. | Your system needs to sync with this change. Read the new plan details from the event payload (including metadata!) and update the user's entitlements accordingly. Action: Re-sync the `features` from metadata to your user's permission set. |
To make your webhook handling bulletproof, never process the logic directly in the request handler. Your endpoint's only job should be to verify the event's signature and then immediately hand it off to a background job queue. This prevents timeouts and allows for safe retries if your database or another service is temporarily unavailable. We cover more advanced architectural patterns in our guide on recurring billing with Stripe.
Recovering Lost Revenue with Dunning
Webhooks tell you when a payment fails. Dunning is what you do about it.
Dunning is just the automated process of chasing down overdue payments. The good news is that Stripe’s built-in dunning tools are incredibly powerful and do most of the heavy lifting for you.
Stripe’s Smart Retries feature is a game-changer. It uses machine learning to retry failed charges at the most optimal times. For example, it won’t waste time retrying a card reported as stolen, but it knows to try a card with insufficient funds again a few days later when the user is more likely to have been paid. This feature alone is a massive lever for cutting down involuntary churn.
In 2025, Stripe Billing skyrocketed to manage over 200 million active subscriptions globally. Its automation is a huge reason for that scale. In fact, Smart Retries and other recovery tools saved businesses over $6.5 billion in failed payments in 2024 alone, directly boosting revenue and retention. You can dig into more of these powerful Stripe statistics and their impact on businesses.
Beyond the "smart" defaults, you can configure the entire dunning lifecycle in your Stripe settings. This lets you customize how many times Stripe retries a card and what emails your customers receive at each step.
A battle-tested dunning flow usually looks something like this:
- First Failure: Stripe uses its Smart Retries logic. It also sends an email to the customer letting them know there was an issue.
- Second Retry (3-5 days later): Another attempt is made, paired with a second, more urgent email.
- Third Retry (5-7 days later): One final attempt to charge the card.
- Final Action: If all retries fail, you configure Stripe to take a final action. For most subscription apps, canceling the subscription is the safest bet to prevent giving away your service for free.
By automating event handling with webhooks and revenue recovery with dunning, you build a resilient Stripe subscription management system. It's a system that protects your revenue and, just as importantly, frees up your team to focus on building a better product instead of chasing down payments.
Integrating the Stripe Customer Portal for Self-Service

Let's be honest: nobody wants to email support to update a credit card. One of the fastest ways to improve user satisfaction and slash your support ticket volume is by giving customers control over their own subscriptions. This is where the Stripe Customer Portal comes in.
It’s a secure, prebuilt interface that lets your users manage their billing details without ever needing to contact your team. For engineering teams, this is a massive win. Instead of burning weeks building and maintaining a custom billing page, you can integrate this with a single API call. Your engineers get to focus on your core product, and your users get the self-service experience they expect.
Generating a Secure Portal Session
The whole process is surprisingly simple and kicks off on your server. When a user in your app clicks a "Manage Subscription" button, your frontend pings your backend. Your backend then creates a secure, one-time-use portal session for that specific customer and sends the URL right back to the client.
The client just needs to redirect the user to that URL. It's that easy. Because the session is already authenticated and tied to their Stripe customer ID, they land inside a portal where they can manage their own details securely.
This is a critical piece of any modern Stripe subscription management strategy. Self-service isn't a luxury; it's a core expectation. A good customer portal reduces churn by removing the friction associated with updating a payment method or changing plans.
Here’s a quick Node.js example showing how to create that portal session. Your backend would run this code for an authenticated user.
// Assumes you have the user's Stripe customer ID
const portalSession = await stripe.billingPortal.sessions.create({
  customer: 'cus_xxxxxxxxxxxxxx',
  return_url: 'https://yourapp.com/account-settings', // Where to send users after they're done
});

// Send this URL back to your frontend to initiate the redirect
const portalUrl = portalSession.url;
This simple flow hands off all the complexity of billing management directly to Stripe. It just works.
Customizing the Portal for Your Brand
While the portal is prebuilt, you still have significant control over how it looks and what it can do. Inside your Stripe Dashboard, you can configure exactly which actions users are allowed to take.
For most subscription apps, you’ll want to enable these key features:
- Payment Method Updates: Let users add, remove, and change their default card. This is non-negotiable for reducing involuntary churn from expired cards.
- Plan Changes: Allow users to upgrade, downgrade, or switch between monthly and annual plans. You can specify exactly which products and prices are available for them to choose from.
- Subscription Cancellation: Provide an option for users to cancel. You can even configure it to offer a pause or a last-minute discount before they finalize the cancellation - a great retention tactic.
- Invoice History: Give users a way to download their past invoices for their own records. This is a common request that you can solve without any support overhead.
You can also customize the branding to match your app’s look and feel by adding your logo and changing the colors. This creates a seamless transition for the user, making the portal feel like a native part of your application. It’s a low-effort, high-impact way to elevate the entire experience.
Sooner or later, every successful app outgrows its first billing system. Many start with platforms like RevenueCat, which are great for getting your subscription logic up and running fast. But as you scale, you'll inevitably hit a ceiling. You'll want more granular control over pricing experiments, direct access to your customer data, and the ability to build custom billing logic. That’s when a direct Stripe subscription management integration becomes the only logical path forward.
I’ve seen this transition play out dozens of times. The thought of migrating an active subscriber base is enough to give any founder nightmares. The goal is simple but high-stakes: move every single customer without a single service interruption or accidental double-charge. This isn't a weekend project; it's a carefully staged operation that puts data integrity and customer trust above everything else.
Crafting Your Migration Plan
Before you touch a single line of code, you need a battle plan. A successful migration is 90% planning and 10% execution. This isn't just about moving data from point A to point B; it’s about translating your old system's customer and subscription models into Stripe's object model.
Your strategy will look something like this, from a high level:
- Export Everything: Pull a complete data dump from your current provider. You need customer emails, active plan details, subscription start dates, and - most importantly - the underlying payment method tokens from the processor (which is hopefully already Stripe).
- Import to Stripe: Use the Stripe API to create new
Customerobjects. The magic here is importing the payment tokens without forcing users to pull out their credit cards again. This is the lynchpin of a smooth migration. - Recreate Subscriptions: Build out the corresponding subscriptions in your Stripe account. You must be meticulous, ensuring billing cycle dates, trial periods, and plan details are a perfect match.
- Execute the Cutover: Pick a specific date and time - usually during a low-traffic window - to flip the switch. From this moment on, your app’s logic stops creating subscriptions in the old system and starts creating them directly in Stripe.
A huge mistake I see teams make is trying to migrate everyone at once in a "big bang." Don't do it. A much safer approach is to route all new subscribers directly to your new Stripe integration first. This lets you battle-test your setup in production while you methodically migrate your existing customer base in the background.
Handling Your Existing Subscribers Without Drama
The most sensitive part of this whole process is, without a doubt, moving your active subscribers. You can't just cancel their old plan and start a new one - that’s a recipe for angry support tickets about double-billing or service getting cut off.
The key is to take advantage of Stripe’s ability to import existing payment details. If your old provider was already using Stripe under the hood, this is much easier. You can often work with both providers to transfer the Stripe Customer and PaymentMethod IDs directly into your own Stripe account. This lets you seamlessly take over the billing cycle for that user. If you're considering this move, it’s worth taking a moment to review different subscription management platforms to see which ones offer the smoothest exit path.
Once you’ve recreated a user's subscription in Stripe, you have to execute one final, critical step. You must set the billing_cycle_anchor to their next renewal date. This tells Stripe, "Don't charge this person right now; wait until their next scheduled payment is due." This single parameter is what prevents chaos and ensures your customers don't even notice the transition happened. It’s the difference between a smooth migration and a self-inflicted catastrophe.
Your Stripe Subscription Management Questions Answered
No matter how well you plan, you're going to hit a few roadblocks during a Stripe implementation. It just happens. This section cuts right to the chase on the most common hurdles we see engineers and founders run into, with quick answers to get your project moving again.
How Do I Test My Subscription Logic?
A classic worry: how do you test your entire billing flow without running real credit cards? Stripe’s test mode is your first stop. It gives you a whole set of test card numbers to simulate everything from successful payments to declines and even cards that need 3D Secure.
But the real magic for testing the full subscription lifecycle is the test clock feature. This tool lets you time-travel.
- Actionable Example:
- Create a test clock and a test customer associated with it.
- Create a subscription for that customer with a 14-day trial.
- Advance the test clock by 15 days using the API.
- Instantly, you can verify that your
invoice.payment_succeededwebhook fired for the first charge. - A quick check of your own database confirms the user's access was updated right after the trial ended.
This lets you validate your entire renewal, trial conversion, and dunning logic in a matter of minutes, not weeks.
How Should I Handle Feature Entitlements?
The most resilient way to manage features for different subscription tiers is by using Stripe’s metadata. Don't hard-code logic like if (user.plan === 'pro') directly in your app. That's a recipe for future headaches. Instead, store your entitlements on the Stripe Price object itself.
For example, when setting up your "Pro" plan, you’d add metadata like this: {"features": "unlimited_projects,advanced_analytics"}. When a user subscribes, your webhook handler for invoice.payment_succeeded simply reads this metadata. From there, it syncs these entitlements to your local user database. This makes Stripe the single source of truth for what each plan includes.
Actionable Insight: This pattern makes your business model incredibly agile. Want to add a new "priority_support" feature to the Pro plan? Just update the metadata on the Price object via the Stripe API or Dashboard. Every new subscriber gets it instantly, with zero code deployment.
Can Stripe Be Used Alongside Other Platforms?
Absolutely. In fact, it's a very common architecture, especially for mobile-first companies. Many apps use a platform like RevenueCat to manage in-app purchases on iOS and Android while using Stripe for all web-based subscriptions. This hybrid approach ensures you capture revenue from every possible channel.
The key is building a unified entitlement system on your backend.
Actionable Insight: When a user subscribes on your website via Stripe, your server should listen for the invoice.payment_succeeded webhook. In that webhook handler, make an API call to RevenueCat's /subscribers/{user_id}/entitlements/{entitlement_id} endpoint to grant them the equivalent mobile entitlement. This creates a seamless, cross-platform experience. Your user's subscription status is recognized whether they open the app on their phone or log in through your website. As you weigh your options, a good Stripe vs Square vs PayPal comparison can help you understand where each player fits in the broader payments ecosystem.
At Vermillion, we specialize in building and maintaining these exact kinds of resilient subscription systems for React Native apps. If you're a marketing-first founder who needs engineering velocity that matches your growth speed, we operate as an embedded partner to ship the features that drive your business forward. Learn more about how we can help you scale at https://vermillion.agency.
Keep reading
See all →
March 22, 2026
Unlocking Revenue Your Guide to Price Tier Strategy
March 20, 2026
Recurring Billing With Stripe a Guide for Subscription Apps

May 14, 2026
Fractional Mobile Engineering vs. Full-Time Hiring in 2026
The mobile engineering talent market has shifted dramatically over the past two years. Budgets are tighter, AI tools have changed what a sin...

March 19, 2026
Unlocking Growth with Mobile App Retention Metrics
Discover the mobile app retention metrics that directly fuel MRR growth. This founder's guide offers actionable strategies to track, analyze...

March 18, 2026
How to Launch an App in 2026 A Startup Playbook
Learn how to launch an app with our complete playbook for subscription startups. Covers MVP development, app store release, analytics, and g...