Vermillion Insights
March 5, 2026 · Ken Vermeille · 17 min read
Mastering iOS Universal Links in React Native Apps
A complete guide to implementing iOS Universal Links in React Native. Learn to drive users from web to app and boost conversions for your subscription business.
At its core, iOS Universal Links are just standard web links - like https://yourapp.com/promo - that are smart enough to know if your app is installed. If it is, tapping the link doesn't open a browser. It opens your app directly to the right screen. It's a simple concept, but the impact is massive.
This creates a fluid, uninterrupted path from where a user is (an email, an ad, a social post) to where you want them to be in your app.
Why Universal Links Are a Game Changer for Subscription Apps

For any subscription app, the journey from a curious visitor to a paying subscriber is everything. Every single bit of friction - an extra tap, a confusing redirect, a login wall - is a leak in your conversion funnel. This is where iOS Universal Links stop being a neat technical feature and become a serious business tool.
I've seen this play out with dozens of subscription apps we've worked on. A well-implemented Universal Link strategy isn't just a "nice-to-have"; it directly boosts offer-specific conversion rates.
The Problem With Old-School Deep Links
Before Universal Links, we had custom URL schemes, like yourapp://promo. They were a decent first step, but they had a fatal flaw. If a user tapped that link but didn't have your app installed, they'd get a big, ugly "Cannot Open Page" error in Safari. It was a dead end.
Universal Links solve this beautifully. Because they are just standard https links, they have a built-in fallback. If the app isn't there, the link simply opens your website. No errors, no confusion. Just a seamless web experience where you can prompt them to download the app.
For a quick breakdown, here’s how they stack up against each other.
Universal Links vs Custom URL Schemes
| Feature | Universal Links | Custom URL Schemes |
|---|---|---|
| Link Format | Standard HTTPS (`https://...`) | Custom (`yourapp://...`) |
| App Not Installed | Opens your website (graceful fallback) | Shows a "Cannot Open Page" error |
| Security | Secure; verified by Apple | Insecure; can be hijacked by other apps |
| Privacy | Preserves user privacy | Can be used to query for installed apps |
| Flexibility | One link works everywhere (web and app) | Only works if the app is installed |
It’s pretty clear why Apple has pushed everyone toward Universal Links. They're more secure, more reliable, and just offer a far better user experience.
Bridge Your Marketing Directly to the Paywall
Imagine sending a marketing email advertising "50% off your first year." With Universal Links, a user taps that link and is taken instantly to your app's paywall with the 50% discount already applied.
Practical Example: A meditation app sends a push notification with the text, "Feeling stressed? Unlock our 'Anxiety Relief' series now." The notification is linked to https://meditate.app/series/anxiety-relief. A paying subscriber taps it and lands directly on that content series. A non-subscriber taps it and is taken to a paywall specifically offering a subscription to unlock that series. That's the power of context.
The goal is to make subscribing feel like a natural next step, not a chore. By deep-linking directly from an ad or email into a pre-loaded checkout screen, you eliminate the cognitive load and guide the user straight to the finish line.
The good news is that the vast majority of your users can benefit from this. Recent data from 9to5Mac shows that 74% of iPhones introduced in the last four years are already running iOS 17 or later, ensuring your implementation will reach a huge audience.
By understanding the different subscription business model examples, you can craft even more effective Universal Link campaigns. Aligning your links with specific offers for different user segments transforms a simple link into a high-precision marketing instrument.
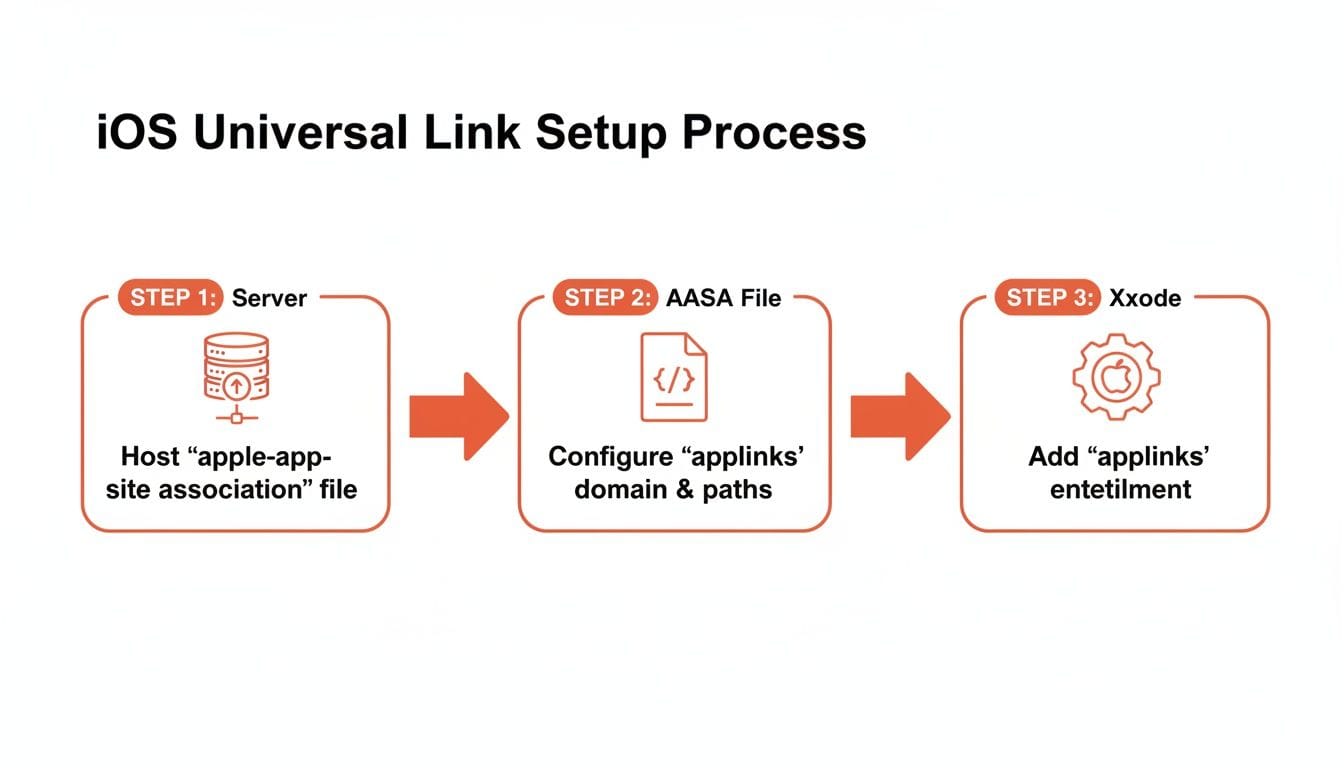
Configuring Your Server and Xcode Environment
This is where the rubber meets the road for iOS Universal Links, and frankly, it's where most setups fall apart. A single misplaced file or a tiny typo can break the entire flow. We're going to walk through this part carefully to make sure you get it right the first time.
What we're doing here is creating a secure handshake between your website and your app. You're basically putting a file on your server that tells Apple, "Hey, I own this domain, and I give my app permission to open its links." It's a trust exercise, and Apple is very strict about the rules.
The Apple App Site Association (AASA) File
The heart of this entire setup is a small JSON file named apple-app-site-association. Don't let its simplicity fool you; its contents and location are incredibly specific. When a user installs or updates your app, Apple’s servers hit your domain looking for this exact file to verify that you've approved this link-opening behavior.
This file is where you define which of your apps can handle links and, more importantly, which specific URL paths should trigger the app to open. You can use wildcards (*) to match entire sections of your site, giving you a ton of control.
Actionable Insight: Use the AASA file to be highly specific. For instance, you might want all links starting with /promo/ to route into your app's paywall, but keep your /blog/ links opening in Safari. The AASA file is where you lay down these laws.
Crafting Your AASA File
Let's put together a practical AASA file for a subscription app. We'll want to handle links for special promotions, seasonal offers, and maybe even direct links to user-specific content.
Here’s a template you can copy and paste. The only thing you need to change is the appID, which is just your Team ID and your app's Bundle Identifier put together (it looks like A1B2C3D4E5.com.yourapp.name).
{
  "applinks": {
    "details": [
      {
        "appIDs": ["YOUR_TEAM_ID.com.your.bundle.id"],
        "components": [
          {
            "/": "/promo/*",
            "comment": "Matches any promotional link, like /promo/summer-sale"
          },
          {
            "/": "/offer/*",
            "comment": "Handles specific offers, like /offer/annual-discount"
          },
          {
            "/": "/content/view/*",
            "comment": "Opens specific content directly in the app"
          },
          {
            "/": "/reset-password",
            "exclude": true,
            "comment": "Ensures password resets always open in the browser."
          }
        ]
      }
    ]
  }
}
This configuration tells iOS that any link from your domain that matches these path patterns should be handed off to the app you specified. Notice the exclude property - this is a powerful tool to prevent certain links, like password resets, from opening in the app, ensuring a consistent web-based flow for security-sensitive actions. For developers building more intricate systems, understanding how this server-side configuration plays with your app's backend is key; you can see a parallel in how an API for microservices orchestrates different parts of an application.
Hosting the AASA File
How and where you serve this file is non-negotiable. I've seen more Universal Link implementations fail at this step than any other. Apple is extremely picky here.
You must place the apple-app-site-association file - with no .json file extension - inside a .well-known directory at the very root of your domain.
- This is the only way it works:
https://your-domain.com/.well-known/apple-app-site-association - This will fail:
https://your-domain.com/apple-app-site-association
Key Takeaway: The file must be served over HTTPS with a valid SSL certificate. And here's the real kicker: no redirects. If a request to that URL gets a 301 or 302 redirect, Apple’s validation will fail instantly. No exceptions.
Configuring Your Xcode Project
Once your server is ready, the last piece of the puzzle is telling your app which domain it's allowed to listen to. You'll do this right inside Xcode.
First, pop open your project in Xcode and find your main app target. From there, navigate over to the Signing & Capabilities tab.
You'll see a + Capability button. Click that, search for Associated Domains, and double-click to add it to your project.
A new section will show up. Just click the + button and add your domain, but make sure you prefix it with applinks:. This prefix is what tells iOS these domains are for Universal Links specifically.
- Use this exact format:
applinks:your-domain.com
Actionable Insight: If you have a staging environment, add its domain here as well (applinks:staging.your-domain.com). This allows you to test your entire Universal Link flow in a pre-production environment. Just remember that the staging domain must also serve its own valid AASA file.
Alright, you've got the server and Xcode pieces in place. Your app is officially listening for your domain. Now for the fun part: making your React Native app actually do something when a Universal Link comes in. This is where the client-side logic comes alive, ensuring a tap on a link smoothly guides a user to the right screen or, even better, a specific offer.
The whole setup - from your server to the AASA file to Xcode - is a chain of trust. Each step validates the next, creating a secure handshake between your website and your app.
With that trust established, let's wire it up inside your React Native code.
Tapping Into React Native's Linking Module
React Native gives us a built-in Linking module, which is essentially the command center for all incoming URLs. It has everything we need to catch links that either wake our app from a killed state or are tapped while it's already running.
You’ll be relying on two primary functions:
- `Linking.getInitialURL()`: This checks if the app was launched from a cold start by a universal link. It’s a promise that gives you the URL, if there is one.
- `Linking.addEventListener('url', callback)`: This is a listener. It fires whenever a universal link is opened while your app is already active, whether it's in the foreground or just sitting in the background.
Together, these two cover all your bases. You won't miss a link, regardless of the app's state.
Handling Links on App Launch and In-App
Let's get practical. I've found the cleanest way to manage this is to create a custom hook or a dedicated utility file. It keeps your main App.js from getting cluttered and centralizes all your routing logic in one place.
Here’s a real-world example of how I combine both methods using a useEffect hook inside a custom useUniversalLinks hook.
import React, { useEffect } from 'react';
import { Linking } from 'react-native';
import { useNavigation } from '@react-navigation/native';

// A practical parsing function
const parseUrlAndNavigate = (url, navigation) => {
  if (!url) {
    return; // No URL to handle
  }

  const { pathname, searchParams } = new URL(url);
  const pathSegments = pathname.split('/').filter(Boolean); // Becomes ['promo', 'annual-50']

  // Example 1: Route to a specific promotion
  if (pathSegments[0] === 'promo' && pathSegments[1]) {
    const promotionId = pathSegments[1];
    navigation.navigate('Paywall', { promotionId });
    return;
  }

  // Example 2: Route to a specific piece of content
  if (pathSegments[0] === 'article' && pathSegments[1]) {
    const articleId = pathSegments[1];
    navigation.navigate('ArticleDetail', { articleId });
    return;
  }

  // Example 3: Handle a user profile link
  if (pathSegments[0] === 'user' && pathSegments[1]) {
    const userId = pathSegments[1];
    navigation.navigate('Profile', { userId });
    return;
  }
};

const useUniversalLinks = () => {
  const navigation = useNavigation();

  useEffect(() => {
    // 1. Handle link that launched the app
    const getUrl = async () => {
      const initialUrl = await Linking.getInitialURL();
      parseUrlAndNavigate(initialUrl, navigation);
    };
    getUrl();

    // 2. Handle links opened while the app is running
    const subscription = Linking.addEventListener('url', ({ url }) => parseUrlAndNavigate(url, navigation));

    return () => {
      // Don't forget to clean up the listener
      subscription.remove();
    };
  }, [navigation]);
};

// You'd call useUniversalLinks() from your root component,
// likely within the component wrapped by NavigationContainer.
The real workhorse here is the parseUrlAndNavigate function. It takes the raw URL, breaks it down, and uses React Navigation to send the user exactly where they need to go. This is how you directly connect your marketing campaigns to your app's UI.
The most powerful part of this whole setup is parsing URL parameters. By adding identifiers like/promo/ANNUAL50or query params like?source=email, you can track campaign performance and completely change what the user sees when they land.
Extracting Value from URL Parameters
This is where a simple link becomes a monetization powerhouse. Imagine you send an email blast with the link https://yourapp.com/offer/BFCM2024?source=email-blast.
Your handleUrl logic grabs that BFCM2024 identifier and the source parameter. You can then pass this ID straight to your paywall component and use the source for analytics. The paywall could then:
- Fetch the correct offering from a service like RevenueCat.
- Dynamically display a headline like "Black Friday Sale - 50% Off!"
- Pre-select the discounted package to initiate the purchase.
- Log an analytics event like
PaywallViewedwith{ campaign: 'BFCM2024', source: 'email-blast' }.
This creates a seamless, contextual, and trackable experience that I’ve seen dramatically increase conversion rates.
For a deeper dive into the broader topic, this guide on React Native deep linking is a fantastic resource that covers setup, testing, and debugging in more detail.
And if you're just getting your feet wet in this ecosystem, our guide on getting started with React Native will give you the solid foundation needed to build your first app. Once you have the fundamentals down, implementing powerful features like universal links becomes much more straightforward. The key is to stop thinking of these links as simple navigation and start seeing them as a core part of your app's growth engine.
Getting iOS Universal Links up and running is a great first step. But the real power isn't just opening your app - it's connecting those links directly to your revenue engine. This is where your engineering work starts printing money, turning a simple URL into a high-octane monetization tool.
Let’s go beyond just launching the app. We're going to build smart workflows that pull users from an email, a social media campaign, or a blog post and drop them right into a frictionless purchase flow.
Architecting a Conditional Navigation Flow
First things first: your app's navigation needs to get smarter. When a user clicks a promotional link, they shouldn't just be dumped on the home screen. They need to land on the exact paywall or offer page they were promised. We can pull this off with some conditional logic right inside our navigation.
With a library like react-navigation, we can intercept the incoming link and make a decision on the fly. Instead of just defaulting to the main app stack, we'll check for a parameter that tells us to show a paywall first.
Practical Example:
- Default Behavior: App opens, user lands on the
HomeScreen. Standard stuff. - Universal Link Behavior: A user clicks
https://yourapp.com/promo/annual-50. The app opens and immediately navigates them to thePaywallScreen, pre-loaded with theannual-50promotion.
You can structure your root navigator to handle this fork in the road, ensuring promotional traffic gets a VIP experience from the moment the app launches.
Integrating With RevenueCat or Superwall
Now for the fun part. This is where the magic really happens for subscription apps. Platforms like RevenueCat, Superwall, and Adapty are built around "Offerings" and "Paywalls" that let you manage different subscription packages and run pricing experiments. Your universal link can carry the exact identifier needed to show the right one.
Let's walk through a real-world example. Imagine you're running an email campaign for a "50% Off Annual" sale.
- The Link: A user taps the button in your email, which points to
https://yourapp.com/offer/rc_annual_50_off. - URL Parsing: Your
handleUrlfunction in React Native grabs the path and pulls outrc_annual_50_off. This is your RevenueCat Offering identifier. - Navigation: The app immediately routes the user to your paywall, passing this ID as a parameter:
navigation.navigate('Paywall', { offeringId: 'rc_annual_50_off' });. - Paywall Logic: Your paywall screen receives this
offeringId, uses it to fetch the specific offering from RevenueCat, and displays it to the user.
By passing an offering identifier directly from a marketing link to your paywall, you remove all guesswork for the user. They see the exact offer they clicked on, which dramatically increases trust and the likelihood of conversion.
This direct path from ad to offer is a cornerstone of effective mobile marketing. It’s also a good reason to stay on top of OS updates. For instance, in 2026, Apple shared iOS 17 adoption stats that confirmed steady user uptake. This reinforces that we can confidently build for modern iOS features like these without worrying about leaving too many users behind. You can read more about the latest iOS adoption trends on MacRumors.com.
A Practical Paywall Example
So, what does that paywall code actually look like? It's surprisingly straightforward. The component just needs to grab the offeringId from the route and use it to show the right packages.
import React, { useState, useEffect } from 'react';
import { View, Text, Button, ActivityIndicator } from 'react-native';
import Purchases from 'react-native-purchases';

const PaywallScreen = ({ route }) => {
  // Use route.params?.offeringId for a safe fallback
  const { offeringId } = route.params || {};
  const [currentOffering, setCurrentOffering] = useState(null);
  const [isLoading, setIsLoading] = useState(true);

  useEffect(() => {
    const getOfferings = async () => {
      setIsLoading(true);
      try {
        const offerings = await Purchases.getOfferings();
        if (offeringId && offerings.all[offeringId]) {
          // If a specific offering ID was passed via link, show it
          setCurrentOffering(offerings.all[offeringId]);
        } else {
          // Fallback to the default "current" offering
          setCurrentOffering(offerings.current);
        }
      } catch (e) {
        console.error("Error fetching offerings: ", e);
        // Fallback in case of an error
        setCurrentOffering(offerings.current);
      } finally {
        setIsLoading(false);
      }
    };

    getOfferings();
  }, [offeringId]);

  if (isLoading) {
    return <ActivityIndicator />;
  }

  // ... rest of your paywall rendering logic ...
  // This would display packages from `currentOffering`
  // and handle the purchase flow with Purchases.purchasePackage(package)
};
Just like that, your paywall component is now dynamic. It can show your default offering or a special promotional one, all based on the link that brought the user into the app. This simple but powerful pattern is an absolute game-changer for maximizing revenue from your marketing campaigns.
By transforming iOS Universal Links from a simple navigational gimmick into a core part of your monetization strategy, you ensure your engineering work delivers a direct, measurable return. You're no longer just building features; you're building revenue-generating pathways.
Testing and Debugging: Where Universal Links Go Wrong

You’ve configured your AASA file and wired up Xcode. You’ve done the hard part, right? Not quite. As any developer who's been through this knows, setup is just the start. iOS Universal Links have a nasty habit of failing silently, leaving you wondering what went wrong.
This is your playbook for figuring it out. Testing isn’t just about seeing if a link opens your app; it's about methodically checking each link in a fragile chain of dependencies. One broken piece, and the whole thing falls apart.
Start on the Server Side
Before you even think about building your app in Xcode, make sure your server is playing by Apple’s rules. A misconfigured apple-app-site-association (AASA) file is, without a doubt, the #1 cause of Universal Link headaches.
Actionable Insight: Use a validator. Apple provides an official AASA Validator, and third-party tools like AASA.validator.com offer even more detailed feedback. Plug in your domain, and it will immediately tell you if:
- The AASA file is being served with the wrong
Content-Typeheader. It must beapplication/jsonorapplication/pkcs7-mime(for signed files), nottext/plain. - Your server is using redirects to serve the file. Apple’s crawlers won’t follow them. Period.
- The JSON itself is busted - a missing comma or a stray bracket will invalidate the whole file.
Spending five minutes here can save you hours of chasing ghosts in your app’s code later. It’s a non-negotiable first step.
Physical Device Testing Is a Must
I can't stress this enough: you must test on a physical iOS device. The iOS Simulator simply doesn't support the full, real-world user flow of tapping a link and having it launch your app.
While you can run some xcrun simctl commands to test deep link logic in the simulator, it doesn't replicate the actual user experience. To be certain your end-to-end setup works, you have to deploy a build to a real iPhone or iPad, either through TestFlight or directly from Xcode.
The most reliable test is dead simple: send yourself the Universal Link in an iMessage or an email. Tap it on your phone. If your app opens, you’re golden. If Safari opens, it’s time to debug.
This also ensures your app will work for your actual users. Despite some noise online, the iOS 17 adoption rate has been strong. This means you can confidently build features like Universal Links knowing the vast majority of your audience can use them. If you're interested in OS adoption trends, you can discover more insights about iOS updates on TechBetweenTheLines.com.
A Checklist for Common Pitfalls
If your links are still kicking you over to Safari, run through this list. I’ve seen these exact issues countless times in the projects we’ve worked on at Vermillion.
1. You Tapped the Link Before Installing the App
iOS only fetches the AASA file once - when the app is first installed or updated. If a user taps your link before the app is on their device, iOS flags that domain to always open in Safari. It remembers that choice, even after they install the app.
- Solution: Delete the app, restart your device for good measure, reinstall the app, and then tap the link.
2. The Dreaded Safari Banner
When a Universal Link works, you’ll see a small banner at the top of your app with your domain name and a small arrow. If a user taps that, they get an option to open the link in Safari. If they choose it, iOS will make Safari the default for that domain from now on.
- Solution: Long-press the Universal Link (in iMessage, Notes, or wherever you have it) and you’ll see a context menu. Choose "Open in [Your App Name]" to reset the preference.
3. Mismatched App ID in the AASA File
A simple typo here will break everything. The appIDs key in your AASA file must be an array containing a string formatted with your Team ID and Bundle Identifier.
- Format:
YOUR_TEAM_ID.com.yourcompany.yourapp - Common Mistake: Forgetting the Team ID or having a small typo in the Bundle ID. Triple-check it against your Apple Developer account and Xcode project settings.
Frequently Asked Questions About iOS Universal Links
Even with the best guide in hand, getting iOS universal links to work can feel like debugging in the dark. You'll follow every step, everything looks right, but it just... doesn't work. I've been there.
Over the years, I've seen the same handful of questions and misunderstandings trip up developers again and again. Here are the straight-up answers to the most common sticking points.
Do iOS Universal Links Work in the Simulator?
Nope. Don't even waste your time trying. This is probably the #1 source of frustration for developers new to Universal Links.
You absolutely have to test on a physical iPhone or iPad. The simulator just can't replicate the deep, system-level handoff that happens when iOS intercepts a web link and decides to open your app instead. To be 100% sure your AASA file, entitlements, and app code are all playing nicely, deploying to a real device is non-negotiable.
What Happens If a User Does Not Have My App Installed?
This is where Universal Links really shine compared to the old, clunky custom URL schemes. If a user taps one of your links but doesn't have your app, it just opens the URL in Safari like any normal link. No errors, no weird pop-ups.
This graceful fallback is a huge win. Instead of hitting a dead end with a "Cannot Open Page" error, the user lands right on your website. You can still provide value and, more importantly, give them a clear path to download your app from the App Store. It turns a potential failure into a conversion opportunity.
Can I Use a URL Shortener With Universal Links?
Technically you can try, but it's a terrible idea and will almost certainly break everything. Services like Bitly are a no-go for Universal Links.
Here's the breakdown:
- The Problem: URL shorteners work by using HTTP redirects (like a 301 or 302). A user clicks the short link, gets redirected to your real URL, and then the magic is supposed to happen.
- The Reality: Apple's validation system, which crawls your domain to find the AASA file, will not follow redirects. It looks for the AASA file directly on the domain in the link itself. When it doesn't find it, the whole system fails validation, and your links will just open in Safari.
Actionable Insight: If you need shorter, more manageable links for marketing, create them on your own domain. For example, set up a server-side redirect from yourapp.com/summer to yourapp.com/promo/summer-sale-2024. As long as the final URL is on your associated domain, Universal Links will work.
How Do I Force a Link to Open in Safari Instead of My App?
The user is always in control. On any iOS device, a user can long-press a universal link and choose to "Open in Safari" from the context menu. If they do this, iOS might even remember that choice and default to the browser for your domain in the future.
As a developer, the best way to offer this choice is by using a "smart app banner" on your mobile website. These banners typically have an "Open in App" button but allow the user to simply ignore it and continue browsing your site. This gives them control and respects their preference, which is always the right move.
If you're building a subscription app and need to ship features like this faster, Vermillion can help. We act as an embedded React Native engineering partner, helping marketing-first app teams accelerate their product velocity without the overhead of hiring. Learn more about how we embed with teams like yours.
Keep reading
See all →
March 22, 2026
Unlocking Revenue Your Guide to Price Tier Strategy
March 21, 2026
Your Guide to Flawless Stripe Subscription Management

May 14, 2026
Fractional Mobile Engineering vs. Full-Time Hiring in 2026
The mobile engineering talent market has shifted dramatically over the past two years. Budgets are tighter, AI tools have changed what a sin...
March 20, 2026
Recurring Billing With Stripe a Guide for Subscription Apps
Master recurring billing with Stripe. This guide covers everything from setup and server logic to webhooks and churn reduction for subscript...
March 19, 2026
Unlocking Growth with Mobile App Retention Metrics
Discover the mobile app retention metrics that directly fuel MRR growth. This founder's guide offers actionable strategies to track, analyze...