Vermillion Insights
March 13, 2026 · Ken Vermeille · 19 min read
A Developer Apple In App Purchase Guide for React Native
A complete developer apple in app purchase guide. Learn to master StoreKit, server validation, and subscriptions in React Native with real-world examples.
Implementing Apple In-App Purchases (IAP) in a React Native app can feel like navigating a minefield. For subscription apps, a buggy IAP flow isn't a minor issue - it’s a direct hit to your revenue. This is your field guide for building a developer apple in app purchase system that actually works, from the ground up.
Your Roadmap for Apple In-App Purchases

Getting started with Apple's IAP system isn't just about flipping a switch. It’s a complete ecosystem for managing digital products and subscriptions, all governed by Apple’s frameworks and, let's be honest, their often-confusing rules.
This guide is built on battle-tested patterns from building and scaling production-grade subscription apps. We’re moving past the theory and into actionable advice that gets results. You'll learn the real-world fundamentals of StoreKit, how to set up your products, and how to build a client-side solution that doesn't fall apart under pressure.
The Power of Apple's IAP Ecosystem
The reason we put up with the complexity is simple: the money is huge. Developers have earned over $550 billion since the App Store's launch. In 2025 alone, consumer spending on the App Store clocked in at an incredible $89.3 billion, blowing competitors out of the water.
This ecosystem drove $1.3 trillion in developer billings and sales in 2024, with developers keeping most of it. You can find more details on these trends and how developers are succeeding within the Apple App Store ecosystem.
This creates massive opportunities, especially for subscription apps. Over 95% of apps on the store are free, making IAP the primary way they make money.
Success demands a deep understanding of the entire IAP lifecycle - from fetching products and processing transactions to validating receipts and handling subscription events. A single weak link can break your entire revenue stream.
We'll cover the essential pieces you need to build a rock-solid IAP flow:
- StoreKit & App Store Connect: The foundation where you'll define and manage your digital products.
- Client-Side Implementation: Building the actual purchase experience your users see in React Native.
- Server-Side Validation: The non-negotiable security layer for verifying purchases and managing entitlements.
- Real-Time Notifications: Keeping your subscription states perfectly synced with Apple's servers.
This guide is designed to cut through the noise and give you a clear path forward. Let's get started.
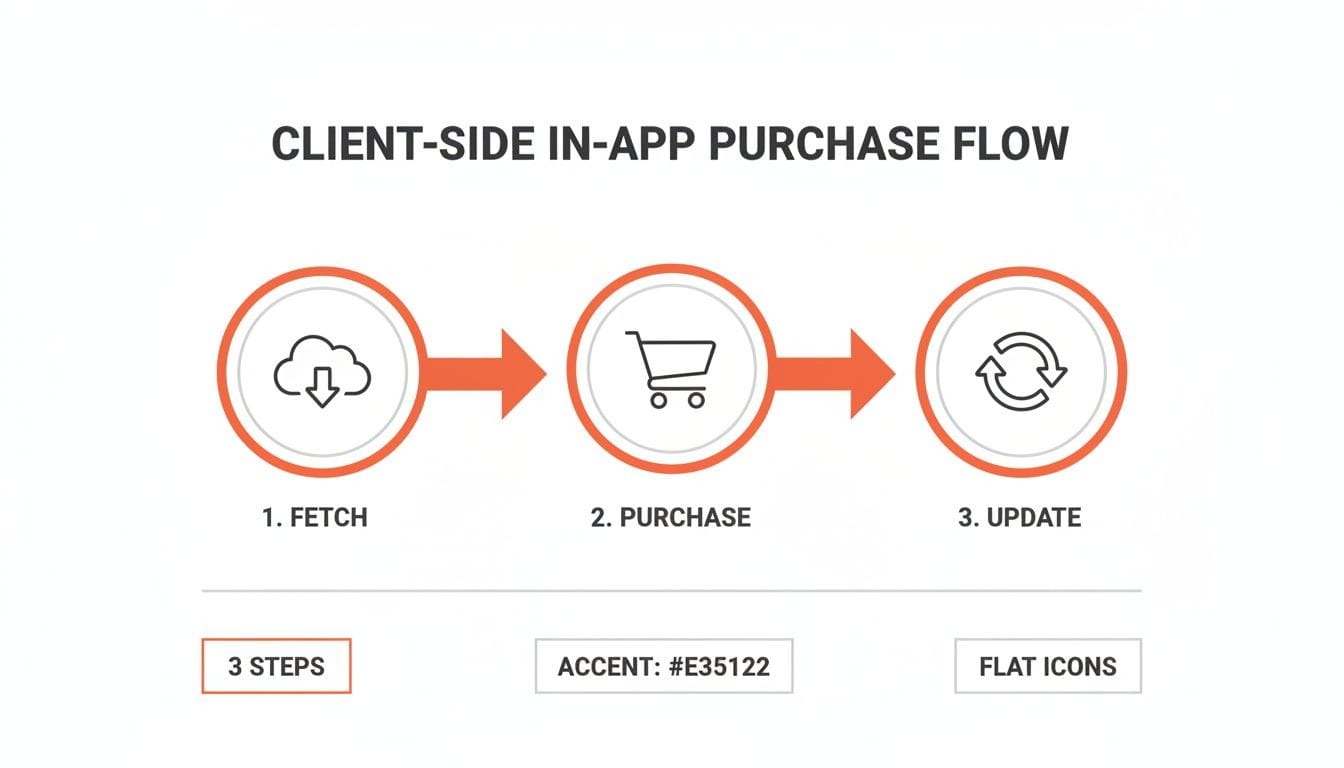
With your products set up in App Store Connect, it’s time to move to the client-side. This is where your users actually interact with Apple's in-app purchase flow. A clunky experience here will kill sales. It's that simple.
We'll be using the battle-tested react-native-iap library as our foundation. But just installing a library won't cut it. The goal is to build a resilient system that can manage the entire transaction lifecycle - from fetching products to gracefully handling a user who cancels or has their payment declined.
Initializing and Fetching Products
First things first, you need to connect to the App Store and load your product details. This has to happen early, long before your paywall ever appears. I like to do this in a global state provider or a top-level component so the product data is ready to go the moment the user sees your offerings.
Actionable Insight: Call initializeIAP inside your root App.tsx component within a useEffect hook. This ensures the connection is established once when the app launches, making product data available globally before any paywall component mounts.
A lean state management tool like Zustand is perfect here. It lets you decouple your IAP logic from your UI, which helps keep your components clean and prevents a ton of unnecessary re-renders.
Here's a snapshot of how I'd structure a Zustand store to manage IAP state. It handles the products, loading status, and the initialization flow.
import { create } from 'zustand';
import {
  initConnection,
  getProducts,
  Product,
} from 'react-native-iap';

interface IAPState {
  products: Product[];
  isLoading: boolean;
  initializeIAP: () => Promise<void>;
}

export const useIAPStore = create<IAPState>((set) => ({
  products: [],
  isLoading: true,
  initializeIAP: async () => {
    try {
      await initConnection();
      // Example: Fetch a list of product IDs from your config
      const skus = ['com.yourapp.monthly', 'com.yourapp.yearly'];
      const products = await getProducts({ skus });
      set({ products, isLoading: false });
    } catch (error) {
      console.error('Failed to initialize IAP', error);
      set({ isLoading: false });
    }
  },
}));
This gives you a tidy initializeIAP function to call once at startup. Your UI components can then just subscribe to the products and isLoading state without needing to know any of the implementation details.
Handling the Purchase Flow
When a user finally hits that "Subscribe" button, you kick off the purchase. This is where things get tricky. You can't just fire off a purchase request and hope for the best; you have to actively listen for transaction updates from the App Store.
Wrapping the IAP logic in a custom React Hook is a solid pattern. It neatly contains the complexity of listening for purchase events and managing the UI states. For a refresher on these core concepts, check out our guide on getting started with React Native.
Here’s how you can extend the flow to request a purchase and listen for the outcome using the useIAP hook.
// Inside a React component or a custom hook
import { requestPurchase, useIAP } from 'react-native-iap';
import { useEffect, useState } from 'react';

// This is your custom hook that encapsulates purchase logic
export const usePurchase = () => {
  const { currentPurchase, finishTransaction } = useIAP();
  const [isPurchasing, setIsPurchasing] = useState(false);

  useEffect(() => {
    const checkCurrentPurchase = async () => {
      if (currentPurchase) {
        try {
          // **IMPORTANT**: Send the receipt to your server for validation here
          // Example: await yourApi.validateReceipt(currentPurchase.transactionReceipt);
          await finishTransaction({ purchase: currentPurchase });
          // Unlock premium features for the user
        } catch (error) {
          console.error('Failed to finish transaction', error);
        }
      }
    };
    checkCurrentPurchase();
  }, [currentPurchase, finishTransaction]);

  const handlePurchase = async (sku: string) => {
    setIsPurchasing(true);
    try {
      await requestPurchase({ sku });
    } catch (error) {
      // The user likely cancelled the purchase or an error occurred.
      console.log('Purchase flow was cancelled or failed', error);
    } finally {
      setIsPurchasing(false);
    }
  };

  return { isPurchasing, handlePurchase };
};
This pattern ensures you're always listening for new purchases and, crucially, completing them correctly.
The single most critical part of this flow is calling finishTransaction. If you don't, you're telling the App Store you haven't delivered the goods yet. This leads to the OS repeatedly prompting the user to complete the purchase every time they open your app - an absolutely terrible experience.Best Practices for a Smooth UX
A solid client-side implementation is obsessed with the user experience. The purchase flow needs to feel seamless, not like a series of disjointed, clunky steps.
Here are a few tips from our experience in the field:
- Give Clear Feedback: When a purchase is in-flight (
isPurchasingis true), show a loading spinner on your call-to-action button and disable it. This prevents frustrated users from tapping it multiple times. - Handle Errors Gracefully: If a payment fails, show a friendly message. Practical Example: Instead of logging the error, show a toast notification:
Toast.show('Payment failed. Please try a different card or contact support.'). Never just dump a raw error code fromreact-native-iapon the screen. - Manage Loading States: Don't let your paywall flash with placeholder prices. Use the
isLoadingstate from your store to display a skeleton loader until your product details are fetched and formatted. - Always Add a "Restore Purchases" Button: This isn't just a nice-to-have; it's a requirement under Apple's App Review Guidelines. It lets users get back their active subscriptions on a new device, and failing to include it is a common reason for rejection.
Implementing Server-Side Receipt Validation
If you’re only validating purchases on the client side, you’re making a huge mistake. It’s the first thing people try to crack. Relying on device-side checks alone is an open invitation for users with jailbroken phones or tampered app files to unlock your premium features for free.
This is why server-side receipt validation isn't optional for any serious app. It's the only way to establish a single, secure source of truth for who has paid and who hasn't.
The concept is straightforward. Your app doesn’t grant access directly. Instead, after a purchase, it sends the transaction receipt to your backend. Your server then checks its authenticity directly with Apple's servers. Only then does your server give the green light to unlock features for that user.
This simple shift makes your backend the sole gatekeeper for entitlements, shutting down the most common piracy methods. It’s a foundational piece of any real security testing in software.
The Server-Side Validation Workflow
The entire flow is a secure, three-part handshake: the device makes the purchase, your server does the critical check, and then your system updates the user's access.
The diagram below shows the initial part of this journey from the app's perspective. It completes the purchase and gets the receipt, but the real work is about to happen on your server.
Once your app gets that successful purchase confirmation, its next job is to hand the receipt off to your backend for the real validation to begin.
Here’s the step-by-step breakdown:
- App Gets the Receipt: After a user buys something,
react-native-iapgives your app a base64-encoded transaction receipt. It’s just a long string of text. - Send to Your Server: Your app then makes a secure API call to your backend, sending this receipt string along with the user's ID.
- Server Validates with Apple: Your backend takes that receipt and forwards it to Apple's
verifyReceiptendpoint. This is the crucial check. - Apple Responds: Apple's servers reply with a JSON object. If the receipt is legit, this object contains all the purchase details, like the product ID and expiration date. If not, it returns an error code.
- Grant Entitlement: If Apple confirms the receipt is valid, your server updates your own database. This is when you officially grant the user access to their subscription tier or premium feature.
This server-centric model is the bedrock of a reliable subscription system. If you want to go deeper, we've covered more ground in our guide on in-app purchases for Apple.
A Practical Node.js Example
Talk is cheap. Let's look at what this actually looks like in code. Here’s a basic endpoint using Node.js and Express that takes a receipt from a client app, sends it to Apple’s sandbox for verification, and updates a user’s status.
const express = require('express');
const axios = require('axios');
const app = express();
app.use(express.json());

// Use 'https://buy.itunes.apple.com/verifyReceipt' for production
const APPLE_VERIFY_RECEIPT_URL = 'https://sandbox.itunes.apple.com/verifyReceipt';

app.post('/validate-receipt', async (req, res) => {
  const { receipt, productId } = req.body;
  const { userId } = req.user; // Assuming you have user authentication middleware

  if (!receipt) {
    return res.status(400).json({ error: 'Receipt is required.' });
  }

  try {
    const response = await axios.post(APPLE_VERIFY_RECEIPT_URL, {
      'receipt-data': receipt,
      // This is found in App Store Connect under "App-Specific Shared Secret"
      'password': 'YOUR_APP_SPECIFIC_SHARED_SECRET',
      'exclude-old-transactions': true, // Actionable Insight: Set to true to get only the latest renewal info
    });

    const { status, latest_receipt_info } = response.data;

    if (status === 0) {
      // Status 0 means the receipt is valid.
      // Actionable Insight: Loop through `latest_receipt_info` to find the transaction for the `productId` you expect.
      // Check its `expires_date_ms` to ensure it's still active.
      console.log('Successfully validated receipt for user:', userId);
      // Example: await db.users.update({ where: { id: userId }, data: { isPremium: true } });
      res.status(200).json({ success: true, entitlements: ['premium'] });
    } else {
      // Apple's status codes tell you what went wrong (e.g., 21007 is a sandbox receipt sent to prod).
      console.error('Invalid receipt, Apple status:', status);
      res.status(400).json({ error: 'Invalid receipt.' });
    }
  } catch (error) {
    console.error('Failed to validate receipt with Apple:', error);
    res.status(500).json({ error: 'Server error during validation.' });
  }
});
This snippet is the heart of a secure in-app purchase backend. It's simple, but it gets the job done.
Receiving App Store Server Notifications
The verifyReceipt endpoint is great for checking a purchase right after it happens, but what about everything else? Subscriptions auto-renew, users get refunds, payments fail, and people cancel. You can't just keep polling verifyReceipt forever to see if a subscription is still active.
That’s what App Store Server Notifications (ASSN) are for.
These are just webhooks. Apple sends a POST request to an endpoint you specify whenever a key event happens in a subscription's lifecycle.
By listening to these notifications, your server becomes the single source of truth for a user's subscription status. You no longer need to poll verifyReceipt to see if a subscription is still active; Apple tells you the moment it changes.Setting up your server to handle these notifications is non-negotiable for a few reasons:
- Proactive Churn Management: Get an instant heads-up on billing issues. Actionable Insight: When you receive a
DID_FAIL_TO_RENEWnotification, automatically trigger an email to the user asking them to update their payment info in the App Store. - Accurate Entitlements: You'll know the exact moment a subscription is cancelled or expires, so you can revoke access precisely on time.
- Clean Data: Your database stays perfectly in sync with Apple, giving you a crystal-clear record of every subscription's journey.
Accelerating Development With Revenuecat
Building the entire infrastructure for Apple In-App Purchases is a massive engineering drain. I've seen it firsthand. For growth-focused subscription apps, this isn't just a technical problem; it's a direct brake on your ability to ship features and actually grow revenue. This is exactly where a platform like RevenueCat becomes a force multiplier.
While building it yourself feels empowering at first, it almost always turns into a maintenance nightmare. Every iOS update risks breaking something. Every new subscription rule from Apple demands code changes. The opportunity cost is staggering - engineers spend weeks on billing logic instead of improving the core app experience that users pay for.
The Strategic Case for Offloading Your Backend
Using a dedicated service like RevenueCat isn't about cutting corners; it's a strategic decision to focus your engineering resources where they create the most value. It provides a reliable, battle-tested subscription backend that handles all the messy parts of IAP for you.
Imagine saving months of development time. That's the real business case. RevenueCat abstracts away the complexities of:
- Server-Side Receipt Validation: You can completely skip building or maintaining your own
verifyReceiptendpoint and managing app-specific shared secrets. - App Store Server Notifications: RevenueCat handles all incoming webhooks from Apple, keeping subscription statuses perfectly synced without you writing a single line of server code.
- Subscription State Management: It creates a clean, unified customer record, tracking everything from trials and renewals to cancellations and billing issues across both iOS and Android.
- Cross-Platform Entitlements: A user's subscription status is tied to their user ID, not their device. This means a user can subscribe on their iPhone and get instant premium access on their Android tablet, no extra work required.
RevenueCat turns a massive, ongoing engineering headache into a simple API call. This frees your team to focus on what they do best: building features that delight users and drive growth.
Integrating Revenuecat in React Native
Let's look at just how much boilerplate this approach gets rid of. Integrating the RevenueCat SDK into a React Native app is remarkably straightforward and replaces huge chunks of the manual react-native-iap code we walked through earlier.
First, install the react-native-purchases package. Then, you just configure it with your API key when your app boots up, typically in your main App.tsx file.
// In your App.tsx or equivalent root component
import React, { useEffect } from 'react';
import Purchases from 'react-native-purchases';
import { useAuth } from './your-auth-hook'; // Example auth hook

const App = () => {
  const { user } = useAuth(); // Get your authenticated user

  useEffect(() => {
    // Enable debug logs for development
    Purchases.setLogLevel(Purchases.LOG_LEVEL.DEBUG);

    // Configure with your public API key
    Purchases.configure({ apiKey: 'YOUR_REVENUECAT_PUBLIC_API_KEY' });

    // Actionable Insight: Identify the user as soon as they log in
    if (user?.id) {
      Purchases.logIn(user.id);
    }
  }, [user]);

  // Your app's components...
  return <YourAppNavigation />;
};
That’s it. The initial setup is done. RevenueCat now automatically starts listening for transactions and syncing the user's purchase history.
Fetching Offerings and Making a Purchase
Instead of fetching individual product SKUs from Apple, RevenueCat uses a powerful concept called Offerings. An Offering is a collection of products you want to present to a user on a specific paywall. This setup is brilliant because it allows you to remotely configure and experiment with different paywalls without having to ship a new app update.
Here’s a simple hook to fetch your offerings and handle a purchase. Notice how clean it is.
import { useState, useEffect } from 'react';
import Purchases, { PurchasesOffering, PurchasesPackage } from 'react-native-purchases';

export const useRevenueCat = () => {
  const [offering, setOffering] = useState<PurchasesOffering | null>(null);
  const [isLoading, setIsLoading] = useState(true);

  useEffect(() => {
    const getOfferings = async () => {
      try {
        const offerings = await Purchases.getOfferings();
        if (offerings.current !== null) {
          // We have a current offering, let's set it
          setOffering(offerings.current);
        }
      } catch (e) {
        console.error('Error fetching offerings:', e);
      } finally {
        setIsLoading(false);
      }
    };
    getOfferings();
  }, []);

  const makePurchase = async (packageToPurchase: PurchasesPackage) => {
    try {
      const { customerInfo } = await Purchases.purchasePackage(packageToPurchase);

      // Check if the user is now entitled to "premium" access
      if (typeof customerInfo.entitlements.active['premium'] !== 'undefined') {
        // Unlock premium features!
        console.log('Purchase successful! User has premium access.');
        // Example: Update local user state to refresh the UI
        // user.setPremium(true);
      }
    } catch (e) {
      if (!e.userCancelled) {
        // An actual error occurred, not just a user cancellation
        console.error('Error making purchase:', e);
      }
    }
  };

  return { offering, isLoading, makePurchase };
};
Look at what's missing: there's no manual initConnection, no finishTransaction, and zero calls to your own backend for validation. It all just happens. This dramatic simplification accelerates your ability to ship and iterate on monetization. For teams trying to move fast, this is a total game-changer. You can find more practical advice in our guide to RevenueCat integration for subscription apps.
Mastering Your IAP Testing Workflow
Testing your developer apple in app purchase flow is one of those things that sounds simple on paper but gets notoriously tricky in practice. You can’t just run it on the iOS simulator and assume everything works. Trust me, we’ve seen teams learn this the hard way.
When real users find a broken payment flow, it’s not just a bug - it’s a direct hit to your credibility and your revenue. A solid testing workflow isn't optional; it's essential. It means combining local simulation with real-world sandbox environments to catch problems long before they reach your customers.
Local Testing With StoreKit Configuration Files
Your first line of defense should be local testing using StoreKit Configuration files right in Xcode. This lets you mock the entire App Store environment on your machine, including the simulator. It's incredibly fast for testing your paywall UI and basic transaction logic without needing a network connection or a sandbox account.
Actionable Insight: Create a .storekit file in Xcode (File > New > File > StoreKit Configuration File). Define your products (e.g., monthly_sub, yearly_sub). Then, in your scheme editor, under Run > Options, select this file for the "StoreKit Configuration" setting. Your app will now use this local mock data on the simulator.
For React Native apps, this requires a small native bridge. You'll need to write a little Swift or Objective-C to load this configuration file when your app is in a DEBUG build. This tells your react-native-iap or RevenueCat SDK to talk to your local mock server instead of Apple's live one. It’s a bit of setup, but the payoff in development speed is huge.
This local-first approach is fantastic for rapid UI iteration and initial logic checks. But don't let it give you a false sense of security. It’s not a substitute for sandbox testing and won’t catch issues with network latency or actual Apple ID authentication.
Sandbox Testing on Real Devices
Once your local tests are green, it's time to test in the sandbox on a physical device. This is the only way to validate the entire end-to-end user experience, from logging into the sandbox to getting a valid receipt from Apple's servers.
Here’s the workflow that works for us:
- Create Sandbox Testers: Head over to App Store Connect and create some Sandbox Tester accounts under "Users and Access." These are fake Apple IDs for making test purchases. You'll need to use real email addresses you control, as they require verification.
- Sign In on Your Device: This is the step that trips up so many developers. You do not sign out of the main Apple ID in the device's Settings. Instead, just launch your app and try to make a purchase. The system will prompt you to sign in, and that's when you enter your Sandbox Tester credentials.
- Test Real-World Scenarios: The sandbox is where you can simulate the full subscription lifecycle. You need to be methodical here. Test everything:
- Initial purchase of every plan (monthly, yearly).
- Subscription upgrades and downgrades.
- Cancellations and what happens when the billing period ends.
- Restoring purchases on a "new" device.
Automating IAP Tests With CI/CD
Manually testing IAP flows is tedious and a recipe for human error. For teams shipping frequently, integrating IAP tests into your Continuous Integration (CI) pipeline is non-negotiable for maintaining quality.
While fully automated end-to-end IAP tests are notoriously complex, you can absolutely set up builds that run a dedicated test suite against the sandbox.
Using a tool like fastlane or a cloud CI service like Bitrise or Codemagic, you can create a specific workflow. This job would build your app, install it on a real device in a device farm, and run automated UI tests with frameworks like Detox or Maestro. These tests can then step through the purchase flow using a pre-configured sandbox account.
Actionable Insight: With Maestro, you can write a simple YAML file to automate a purchase. The test would tap on your subscription button, wait for the OS-level purchase sheet to appear, then tap the "Subscribe" button within that sheet. This can be run automatically on every pull request.
This setup acts as a safety net, automatically verifying that your core monetization logic hasn't been broken by recent code changes. It's the kind of confidence you want before every single release. As you learn to implement and validate IAPs, robust testing is paramount. For a deeper dive into building a quality-focused engineering culture, explore these Software Testing Best Practices.
Troubleshooting Common IAP Problems
Even with a great testing process, you're bound to run into some confusing issues. In-App Purchases have a lot of moving parts, and when something breaks, the error messages from Apple aren't always helpful. Over the years, we've seen the same problems pop up again and again.
Here's a quick troubleshooting guide for the most frequent failure modes we encounter. Keep this handy - it might just save you a few hours of head-scratching.
| Common IAP Failure Modes and Solutions | ||
|---|---|---|
| Symptom | Likely Cause | How to Fix |
| Products not loading (empty array). | 1. Paid Applications Agreement isn't signed. 2. Banking and tax info is missing. 3. Product IDs in your code don't match App Store Connect. 4. Products aren't "Ready to Submit." | 1. Log in to App Store Connect and accept the latest agreement. 2. Fill out all required financial information. 3. Double-check for typos in your product identifiers. 4. Ensure your IAPs have passed review or are in the "Ready to Submit" state. |
| "Cannot connect to iTunes Store" error during purchase. | 1. Signed out of the main Apple ID on the device. 2. Using a simulator. 3. App Store is down. 4. Network issue. | 1. Sign into a valid (non-sandbox) Apple ID in the device's main Settings app. 2. Use a real device for sandbox testing. 3. Check Apple's system status page. 4. Test on a stable Wi-Fi connection. |
| Test purchase prompts for real payment. | You're logged into a real Apple ID instead of a sandbox tester account. | Sign out of the App Store on the device (*Settings > App Store*). Do NOT sign out of iCloud. Relaunch your app, initiate a purchase, and sign in with your sandbox tester credentials when prompted. |
| `restorePurchases` returns nothing. | 1. The sandbox user has no previous purchases. 2. Testing on a different sandbox environment than the purchase was made on. | 1. Make a new purchase with the sandbox user first, then try restoring. 2. Ensure you're consistently using the same sandbox account and device. Sandbox purchase history can be flaky. |
| Subscription status doesn't update after a sandbox purchase. | 1. App Store Server Notification (ASSN) endpoint is failing or not configured. 2. Receipt validation logic is flawed. | 1. Check your server logs for errors from Apple's ASSN service. Test the endpoint. 2. Verify that your server is correctly parsing the `latest_receipt_info` field and checking expiration dates. |
Remember, with IAPs, the problem is often a simple configuration mistake, not a complex code bug. Working through this checklist methodically will help you isolate the issue much faster than random debugging.
Your Top Apple IAP Questions, Answered
Once your In-App Purchase flow is live, the questions don't stop. They just get more specific. The world of Apple IAPs is full of tricky details where one small mistake can cost you revenue or get your app rejected.
Here are the straight-up, actionable answers to the questions we hear most often from teams building subscription apps.
What’s the Real Difference Between StoreKit 1 and StoreKit 2?
The short answer: StoreKit 2 is Apple’s modern, Swift-based framework. StoreKit 1 is the older, clunkier Objective-C version. You should only be using StoreKit 2.
Actionable Insight: StoreKit 2 uses modern async/await APIs, making your code cleaner and easier to debug. For React Native, this means using a library like react-native-purchases (from RevenueCat’s) that is built on top of StoreKit 2. It also handles transaction persistence automatically, so if a user's app crashes mid-purchase, the transaction isn't lost - a massive upgrade in reliability.
Can I Just Test In-App Purchases on the Simulator?
You can for basic UI work, but for anything that matters, no. For full end-to-end testing, a physical device is non-negotiable.
Xcode’s StoreKit Configuration files are great for quickly testing paywall layouts and button logic on the simulator. It’s fast and works offline. But that’s where its usefulness ends.
Actionable Insight: The simulator cannot make real network calls to the Apple sandbox. To truly test the entire flow - logging in with a Sandbox Apple ID, hitting Apple's servers, and validating a real receipt - you absolutely need a physical iPhone. It's the only way to reliably catch errors in tricky scenarios like interrupted purchases or the "Restore Purchases" flow.
Do I Really Need a Server for Receipt Validation?
Yes, 100%. Relying only on client-side validation is a massive security hole.
A determined user on a jailbroken device can easily tamper with your app's local code to unlock paid features for free. This is one of the most common ways apps bleed revenue without even knowing it. Server-side validation is the only way to know for sure if a purchase is real.
Your server must be the single source of truth. It needs to talk directly to Apple's verifyReceipt endpoint to confirm a purchase is legitimate before your backend grants access to premium features.Without this server-side check, you’re essentially building your business on an honor system that can be easily broken.
Why Use RevenueCat Instead of Building It All Myself?
You can absolutely build your own IAP infrastructure. The real question is, should you? Your engineering time is your most precious resource.
RevenueCat, or similar services like Superwall and Adapty, abstracts away the nightmare of IAP complexity. It handles receipt validation, cross-platform subscription state, and App Store Server Notifications out of the box.
Actionable Insight: Think about the cost. The monthly fee for a service like this is almost always a fraction of the engineering salary you’d pay to build and maintain a comparable in-house system. For a startup focused on growth, the math is simple: focus your best people on your core product, not on reinventing the subscription backend. The opportunity cost of having an engineer spend a month on billing logic is far greater than the cost of a service.
What Is That "Restore Purchases" Button For, Anyway?
The "Restore Purchases" button is a mandatory requirement from Apple. If you don't have it, your app will be rejected.
Actionable Insight: Its purpose is to let users who bought a subscription on one device (or reinstalled your app) get their access back without paying again. When a user taps it, your app should call the restore function (e.g., Purchases.restorePurchases() in RevenueCat). This fetches the user's purchase history from Apple's servers, re-validates any active subscriptions, and updates their entitlements in your app. It's a critical, non-negotiable part of the user experience.
Feeling bottlenecked by IAP complexity and slow engineering cycles? Vermillion is an embedded React Native engineering partner for subscription app teams. We live in your Slack and your codebase, shipping production features weekly to match your growth speed. If you're tired of engineering being a roadblock, let's talk about how we can help you move faster. Learn more about our dedicated engineering retainers.
Keep reading
See all →
March 22, 2026
Unlocking Revenue Your Guide to Price Tier Strategy
March 21, 2026
Your Guide to Flawless Stripe Subscription Management

May 14, 2026
Fractional Mobile Engineering vs. Full-Time Hiring in 2026
The mobile engineering talent market has shifted dramatically over the past two years. Budgets are tighter, AI tools have changed what a sin...
March 20, 2026
Recurring Billing With Stripe a Guide for Subscription Apps
Master recurring billing with Stripe. This guide covers everything from setup and server logic to webhooks and churn reduction for subscript...
March 19, 2026
Unlocking Growth with Mobile App Retention Metrics
Discover the mobile app retention metrics that directly fuel MRR growth. This founder's guide offers actionable strategies to track, analyze...