Vermillion Insights
March 16, 2026 · Ken Vermeille · 16 min read
A Developer's Guide to Android In App Purchasing
Master Android in app purchasing in React Native. This guide covers setup, libraries, server validation, and testing for subscription-based apps.
For most app teams, Android in app purchasing is no longer just a feature - it's become the core engine for driving recurring revenue. The era of one-time app sales is over, replaced by subscription models that build predictable, scalable income. This guide is a pragmatic, developer-focused roadmap for getting IAPs right in your React Native subscription app.
The New Reality of Android In App Purchasing

The entire monetization model for mobile has flipped. For years, gaming dominated the Android in app purchasing market, but now, non-gaming apps are the ones generating the most revenue. If you're building a subscription app, this shift represents a massive opportunity to capitalize on Android's enormous user base.
This isn't just a small trend; it's a financial earthquake. By 2025, in-app purchase revenue from non-gaming Android apps rocketed to $85.6 billion, finally pushing past gaming's $81.8 billion. That reflects a 21% year-over-year growth across the board, with new categories like generative AI contributing billions to that total. The data is clear: the money is in subscriptions.
From Downloads to Dollars
The real challenge today isn't just getting downloads; it's turning those users into paying subscribers. A million downloads mean nothing if your monetization strategy is broken. This is where your engineering team's velocity becomes your single greatest competitive advantage.
To win, you have to think beyond just adding a "buy" button. The real goal is to build a seamless and trustworthy user experience that includes:
- Effortless Onboarding: Guiding users to their "aha!" moment so they understand why they should pay. For example, a meditation app might offer a free 3-day "Introduction to Mindfulness" course that shows users the core value before ever showing them a paywall.
- Flexible Paywalls: Testing different prices, trials, and offers to see what actually converts. A fitness app could test a monthly plan at $14.99 vs. an annual plan at $79.99 (a 55% savings) to see which drives higher lifetime value.
- Secure Transactions: Making sure every purchase is validated and premium features are unlocked reliably. If a user buys a "remove ads" feature, it must be removed instantly and permanently across all their devices.
This is precisely why a deep understanding of android in app purchasing is so vital. If you're new to the concept, you can learn the fundamentals of what in-app purchases are and how they work in our detailed guide here: https://vermillion.agency/insights/what-is-in-app-purchase/
The most successful teams don't just build features; they build a monetization machine. Your ability to quickly iterate on your paywall, test pricing, and analyze results directly impacts your monthly recurring revenue (MRR).
The Power of the Right Tools
For React Native teams, building this machine from the ground up is a huge lift. The Google Play Billing library gives you the basic building blocks, but that's just the start. Managing cross-platform entitlements, handling server-side receipt validation, and tracking the entire subscription lifecycle is incredibly complex.
This is where platforms like RevenueCat, Adapty, and Superwall come in. They abstract away all that low-level complexity, freeing up your team to focus on product and growth. To really grasp the landscape, it's helpful to see how Android IAPs fit into the broader context of powerful mobile app monetization strategies.
Think of this guide as your practical roadmap. We'll walk you through choosing and implementing the right tools to turn your app into a thriving subscription business.
Before you touch a single line of React Native, you need to get your hands dirty in the Google Play Console. This is where your entire monetization strategy lives or dies. A sloppy setup here will create a world of pain for you and your developers down the road. Trust me, I've seen it happen.
Think of the Play Console as the bedrock for your app's revenue. This is mission control for defining what users can buy, how much it costs, and how it all behaves. Get the details right now, and you'll save yourself from untangling a mess of purchase logic and pricing experiments later.
Creating Your In-App Products and Subscriptions
First things first, you need to actually create the items you plan to sell. You’ll find this under the “Monetize” section of your app’s dashboard, where you can define both one-time in-app products and recurring subscriptions.
Here’s a critical detail that trips up a surprising number of teams: the Product ID. This is the unique string your code will use to trigger a purchase. Your naming convention is everything here. Don't be lazy.
Avoid generic IDs like pro_subscription_1. A few months from now, that will mean absolutely nothing to you. Instead, create a structured format that gives you context at a glance.
- Actionable Example: Let's say you're launching a new "Gold" yearly plan priced at $49.99 with a 14-day trial. A great ID would be
gold_yearly_4999_trial14d_v1. - Why this works: This ID instantly tells you the tier (
gold), billing period (yearly), price (4999), promotional details (trial14d), and version (v1). When you’re staring at analytics reports or debugging a purchase flow, this kind of clarity is a lifesaver.
And don't forget the user-facing titles and descriptions. These aren't just for you; they're for your customers. A clear title like "Pro Plan - Monthly Access" and a description that spells out the benefits will do far more for your conversion rate than a generic label.
Setting Up Service Accounts and License Testers
To properly validate purchases on your server - and this is absolutely non-negotiable for any serious app - you'll need a Google Cloud service account. In the Play Console, head over to "API access" and link your Google Cloud Project. From there, you'll create a new service account, give it "Billing" permissions, and generate a JSON key file.
Treat this JSON key file like a root password. It gives direct access to your app's financial APIs. Store it securely on your server as an environment variable and never, ever let it get committed to your client-side code repository. An actionable insight here is to use a secrets management service like AWS Secrets Manager or Google Secret Manager. Instead of hardcoding the JSON content into an .env file, your server fetches the key at runtime, reducing the risk of accidental exposure.With your credentials sorted, the next crucial step is setting up your license testers. This is what lets you and your team run through the entire purchase flow in a sandbox environment without spending a dime of real money. Just go to "License testing" and add the Gmail addresses of everyone on your QA and dev teams.
Skipping this step means you’re either flying blind or, even worse, using real credit cards during development. Both are expensive mistakes you don't want to make. This simple configuration is your safety net for launching a bug-free android in app purchasing experience.
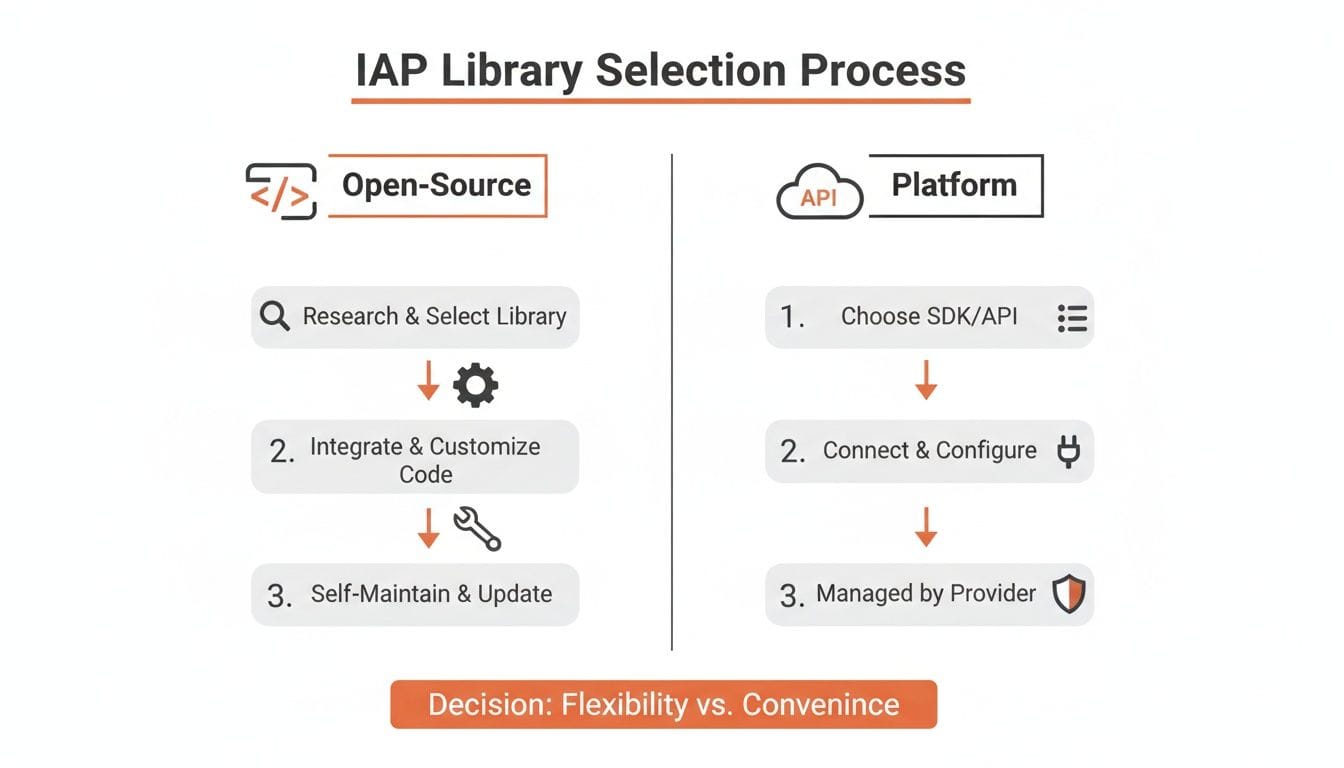
Choosing Your React Native IAP Library
Picking the right library for Android in-app purchasing is one of those decisions that can quietly make or break your project. It's a classic build-vs-buy dilemma that determines whether your team ships new features or gets stuck wrestling with Google Play's subscription logic. Get this wrong, and you'll feel the pain for years.
You're essentially facing two very different paths: the DIY route with a low-level library, or a fully managed subscription platform. Each has massive trade-offs in terms of engineering hours, cost, and raw control.
The DIY Route with react-native-iap
For teams who want total control over their stack and have the backend firepower to match, the open-source react-native-iap library is the go-to. Think of it as a thin wrapper around Google Play Billing's native APIs. It gives you direct access without holding your hand.
The upside is obvious: it’s free. You don't pay any service fees and you own every single part of your IAP infrastructure. But that control comes with a hefty price tag in engineering time.
If you choose react-native-iap, your team is signing up to build and maintain:
- A custom backend server for validating every single purchase receipt.
- A complete subscription state machine to track renewals, cancellations, grace periods, and everything in between.
- Separate cross-platform logic if you also support iOS. You'll need to build another integration for Apple and then figure out how to merge that data. You can find a full breakdown of that world in our guide on developer Apple in-app purchases.
This path really only makes sense for well-staffed engineering teams who have a specific need to own their entire infrastructure.
For most subscription app teams, the time spent building and maintaining a custom IAP backend is time not spent improving the core product. The opportunity cost can be enormous.
Managed Platforms Like RevenueCat and Adapty
Now for the other side of the coin: managed subscription platforms like RevenueCat, Adapty, and Superwall. These tools are designed to do one thing: absorb all the complexity of in-app subscriptions so you don't have to.
Instead of talking directly to Google Play, you integrate their unified SDK. The difference in speed is night and day. A platform like RevenueCat gives you a battle-tested backend for receipt validation, tracks the entire subscription lifecycle, and handles cross-platform entitlements right out of the box. Your team can ship a secure, production-ready paywall in a fraction of the time.
The sheer scale of the market makes these tools almost a necessity. The in-app purchase economy is exploding, growing from $166.6 billion in 2024 to an expected $190.2 billion in 2025. With Google Play alone seeing 102.4 billion downloads in 2024, you need a reliable way to handle that volume without reinventing the wheel.
The trade-off, of course, is cost. These platforms typically take a small percentage of your revenue. But for most teams, that fee is a rounding error compared to the engineering salaries you'd spend building and maintaining your own system. Plus, you get powerful extras like revenue analytics, A/B testing tools, and webhooks that give you a clear view of your business's health from day one.
React Native IAP Library Comparison
To make the decision clearer, here’s a breakdown of the most common options and where they fit best.
| Library | Best For | Key Advantage | Key Disadvantage |
|---|---|---|---|
| `react-native-iap` | Teams with strong backend resources who need 100% control and want to avoid revenue-share fees. | Total ownership; no ongoing service costs. | Massive engineering overhead; you build and maintain everything. |
| RevenueCat / Adapty | Most startups and teams who want to move fast and focus on their core product. | Drastically reduced time-to-market; reliable backend, analytics, and cross-platform support out of the box. | Monthly fee based on a percentage of your IAP revenue. |
| Superwall | Teams focused on paywall optimization and A/B testing from day one. | Advanced paywall builder and testing features integrated with the IAP backend. | Higher cost and potentially more complex than simpler alternatives if you don't need the advanced features. |
Ultimately, this choice comes down to your team's most valuable resource. If you have more engineering hours than cash, the DIY route might seem tempting. But if your goal is to get to market quickly and iterate on your actual product, a managed platform is almost always the smarter business decision.
Building Your Purchase Flow and Validating Transactions
Now that the groundwork is laid, it's time to build the part of your app that actually makes money: the purchase flow. This is where all those configurations in the Play Console turn into a real, user-facing paywall. The goal here is to make the experience feel so intuitive and trustworthy that users don't even hesitate.
A solid first move is to fetch your available subscriptions directly from the Google Play Store. Whether you're using react-native-iap or a platform like RevenueCat, you can pull product details - like the localized price, title, and currency - straight from the source. This is a game-changer because it means your paywall will always show the correct pricing, exactly as you set it up.
From there, kicking off a purchase is usually just a single function call. You pass the product's ID to your library, and it handles launching Google Play's native purchase screen. Your app's job is to sit back and listen for the result, which will fall into one of three buckets:
- Success: The user bought it. Time to unlock the good stuff.
- Error: Something went sideways. Maybe a bad network connection or a declined card.
- Cancelled: The user changed their mind and backed out.
How you handle these outcomes is everything. A simple loading spinner while the purchase is processing and a clear "Success!" or "Oops, try again" message makes a world of difference for user trust.
The Non-Negotiable Step: Server-Side Validation
If you remember one thing from this guide, make it this: never, ever trust the client. Any logic that lives only inside your app can be cracked, bypassed, or manipulated. I've seen teams lose staggering amounts of revenue because a determined user found a way to trick the app into thinking a purchase was made.
This diagram breaks down the two architectural paths you can take.
The only secure way forward involves a server that you control - either one you build yourself or a managed platform like RevenueCat that handles the heavy lifting.
The correct flow looks like this: your app gets a purchase receipt (a unique purchaseToken from Google) and sends it to your backend. Your server then talks directly to the Google Play Developer API to ask, "Is this for real?" Only after your server gets a thumbs-up from Google do you grant the user access to their premium features.
Using Webhooks for a Single Source of Truth
For subscription apps, server-side validation is just the starting line. What happens when a subscription renews next month? Or when a user cancels? Or when their payment fails and they enter a grace period? Your app might not even be running when these events happen.
This is where webhooks are indispensable. Google calls them Real-Time Developer Notifications, and they are exactly what they sound like. Instead of your app constantly polling the server to ask, "Is this user still subscribed?", the Google Play Store proactively tells your server about any changes to a subscription's status.
By using webhooks, especially through a platform like RevenueCat, you establish your own server as the undeniable source of truth. Your database knows exactly who should have access and who shouldn't, no matter what the app on the device thinks. It's the key to making entitlements work reliably across devices and even after an uninstall. For example, when your server receives aSUBSCRIPTION_CANCELEDwebhook, you can update asubscription_expires_atfield in your user database. Then, your app's logic for premium access simply becomes "does this user have an expiration date in the future?"
For teams building sophisticated apps, our engineers often provide expert RevenueCat integration services to ensure this critical infrastructure is built correctly from day one. As you build, it's also smart to consider tricky edge cases, like testing 3DS checkouts in in-app browsers, which can throw a wrench in the works if you're not prepared.
By pairing server-side validation with webhooks, you create a bulletproof system for managing your android in app purchasing lifecycle. It's not the easy path, but it's the only one that's secure and scalable.
End-to-End Testing for a Confident Launch
Let's be blunt: shipping untested android in app purchasing code is like lighting your revenue on fire. A broken purchase flow doesn't just cost you a sale; it erodes user trust and floods your app with one-star reviews that are nearly impossible to recover from.
This is your battle plan for testing everything from the paywall to your backend, so you can launch knowing your revenue engine actually works.
The stakes are enormous. The Google Play Store is a battlefield with around 1.66 million apps, where 97% of them are free. This makes in-app purchases the only viable path for most. And with Google rejecting 2.36 million apps in a single year for quality issues, you can bet they're scrutinizing billing flows. You can get a sense of the scale from recent Android and Google Play Store statistics.
Your most critical tool here is the Google Play sandbox, which you’ll use with the license tester accounts we set up earlier. This combo lets your team run through every possible purchase scenario without ever touching a real credit card.
Your Pre-Launch Testing Checklist
Before you even think about hitting that "publish" button, you need to hammer on these core scenarios using your license tester accounts. We've seen apps go live after missing just one of these, and the result is always a frantic weekend of bug fixes and angry user emails.
Make sure your app and server can handle every one of these cases:
- The Happy Path: A user buys a subscription for the first time. They should get instant access to premium features. Actionable Insight: Don't just check that a
is_proflag is true; navigate through your app to confirm the premium features are actually unlocked and visible. - Failed Purchase: The payment fails. Maybe it's an expired card or not enough funds. Your UI must show a clear, helpful error message, not just a generic "error" alert. A good message is "Payment Failed. Please check your card details and try again."
- Purchase Abandonment: The user gets to the Google Play purchase screen and simply hits the back button. Your app needs to return to its previous state gracefully, without crashing or getting stuck in a weird UI loop.
- Duplicate Purchase: A user tries to buy an active subscription they already own. Google Play should prevent this, and your UI needs to acknowledge it correctly - perhaps by directing them to their subscription management screen.
- Subscription Renewal: The sandbox makes this easy by accelerating time. A monthly plan might renew every 5 minutes. Watch your server logs to confirm you're receiving the renewal webhook and correctly extending the user's entitlement.
- Subscription Cancellation: The user goes to the Play Store and cancels their subscription. Your backend must get the webhook and ensure their premium access is revoked at the end of the current billing period, not immediately.
Physical Devices vs. Emulators
You can do some initial sanity checks on an Android emulator - as long as it has the Google Play Store and you're logged in with a test account. But that's where it ends. Your final, pre-launch testing must happen on real, physical hardware.
Emulators are sterile environments. They won't show you how your purchase flow behaves on a spotty 4G connection, or how it gets killed in the background by an aggressive OS on a specific Samsung model. We’ve debugged bugs that only appeared on certain Pixel devices. Test on real phones to avoid real user complaints.
As a final line of defense, always use Google Play's internal and closed testing tracks. Roll out your build to a small group of trusted testers first. This is your last chance to catch those weird, device-specific bugs before your android in app purchasing flow is exposed to your entire user base.
Android In-App Purchasing: Your Top Questions Answered
When you're wrestling with Android in-app purchasing, you start to see the same questions pop up again and again. Developers constantly hit the same roadblocks, from handling user purchase states to making sure their app sails through the Google Play review process.
Here are the straightforward, no-nonsense answers to the hurdles we see developers face most often.
How Do I Handle Restoring Purchases on Android?
This is a big one, especially for developers coming from iOS. Unlike Apple, where a "Restore Purchases" button is a hard requirement, Google Play handles this very differently. It automatically syncs most active subscriptions whenever a user reinstalls your app or signs in on a new device.
Your job isn't to build out some complex restoration flow. Instead, you need to correctly query the user's purchase status every time the app starts.
An actionable example is to call Purchases.getCustomerInfo() with the RevenueCat SDK in your app's main entry point (e.g., App.js inside a useEffect hook). This single action syncs the app's local state with Google's records. While we still recommend including a "Restore Purchases" button for user confidence and catching rare edge cases (like calling the same function on button press), your core logic should be fully automatic. With react-native-iap, the equivalent is getAvailablePurchases().
What's the Best Way to Manage Subscription Status Changes?
Relying on the app itself to be the source of truth for a subscription is a recipe for disaster. Phones die, users uninstall apps, and network connections fail. The only bulletproof method is to use server-to-server notifications, which Google calls Real-Time Developer Notifications (RTDN).
Platforms like RevenueCat, Adapty, or Superwall make this much easier by packaging RTDNs into simple webhooks.
These automated messages fire from Google's servers directly to your backend whenever a key subscription event happens - a successful renewal, a cancellation, a billing failure, or when a user enters a grace period. A practical example is setting up an endpoint likePOST /webhooks/revenuecaton your server. When a cancellation event comes in, your code finds the user in your database and updates theirentitlement_expires_atfield. This creates a system that works perfectly even if the user deleted your app months ago.
Can I Test Android IAP Without a Physical Device?
Yes, and you can get surprisingly far with just an Android emulator. As long as you've set up an emulator version that includes the Google Play Store and you're signed in with a designated license test account, you can run through the entire sandbox purchase flow. This is perfect for initial development and making sure your paywall UI is wired up correctly.
That said, final pre-launch testing on a physical device is absolutely non-negotiable.
Emulators can't truly replicate real-world network flakiness, OS-specific background process limits, or bizarre hardware quirks. We've personally seen bugs that only appear on specific Samsung or OnePlus models. Testing on real hardware is your last, and most important, line of defense against a buggy launch.
What Are the Most Common Rejection Reasons for Apps with IAP?
Google's review team is obsessed with a clear and fair user experience. Nearly every rejection we've seen for Android in app purchasing boils down to a lack of transparency or just plain broken functionality.
- Confusing Pricing: Your paywall must clearly state the full price and billing frequency (e.g., "$9.99/month" or "$59.99/year"). Hiding terms or making the price ambiguous before the user initiates the purchase is a fast track to rejection. Actionable insight: Before the Google Play purchase sheet appears, your UI must show the price and billing cycle. For a free trial, it must explicitly state "7-day free trial, then $59.99/year."
- Broken Functionality: A "Restore Purchases" button that does nothing or a purchase flow that crashes or hangs is an instant rejection. Test every single button and every possible user path.
- External Payment Links: Guiding users to an external website to pay for digital goods is one of the biggest policy violations you can make. This will get your app rejected and could even lead to your account being flagged.
Always make sure your pricing is dead simple to understand and that every single piece of your purchase flow is rock-solid before you hit that "Submit for review" button.
If your team is focused on growth but bottlenecked by engineering, Vermillion can help. We embed senior React Native engineers into your team to ship paywall experiments, new features, and subscription logic at the speed your business demands. Find out how we deliver a weekly shipping cadence you can count on.
Keep reading
See all →
March 22, 2026
Unlocking Revenue Your Guide to Price Tier Strategy
March 21, 2026
Your Guide to Flawless Stripe Subscription Management

May 14, 2026
Fractional Mobile Engineering vs. Full-Time Hiring in 2026
The mobile engineering talent market has shifted dramatically over the past two years. Budgets are tighter, AI tools have changed what a sin...
March 20, 2026
Recurring Billing With Stripe a Guide for Subscription Apps
Master recurring billing with Stripe. This guide covers everything from setup and server logic to webhooks and churn reduction for subscript...
March 19, 2026
Unlocking Growth with Mobile App Retention Metrics
Discover the mobile app retention metrics that directly fuel MRR growth. This founder's guide offers actionable strategies to track, analyze...