Vermillion Insights
January 21, 2026 · Ken Vermeille · 19 min read
A Guide to Product Development Lifecycle Stages
Explore the product development lifecycle stages. Learn how to turn an idea into a successful product with our guide on ideation, design, launch, and growth.
Bringing a new product to life is a journey - one that takes an idea from a napkin sketch to something real that people can use. The product development lifecycle is the roadmap for that journey. It breaks the whole chaotic process down into clear, manageable stages that protect you from building the wrong thing.
For startups, this isn't just a nice-to-have process. It's the difference between burning through your seed round and finding a path to real, sustainable growth.
Mapping Your Journey Through the Product Lifecycle
Think of building a product like building a house. You wouldn't just start pouring concrete without a blueprint, right? And you definitely wouldn't put up walls before you knew where the rooms were supposed to go. Each stage in the product lifecycle serves a critical purpose, ensuring the final structure is solid, valuable, and exactly what the customer actually needs.
A structured approach like this stops teams from wasting months and money on features nobody asked for or launching a product that doesn't solve a real-world problem. If you're looking for a deep dive into the entire process, guides on how to build a mobile app from idea to launch are a great place to start.
Why a Structured Lifecycle Matters
Look, turning a vision into a real product is messy. A defined lifecycle brings order to that chaos. It's a framework that turns a big, complex goal into a series of smaller, more manageable steps. Here’s why it’s so important:
- It Slashes Risk: By testing your ideas and prototypes early and often, you can spot the fatal flaws before you've sunk a fortune into development. For example, Dropbox famously used a simple explainer video to test demand before building anything. The video drove thousands of sign-ups, proving people wanted the product.
- It Gets Everyone on the Same Page: When you have clear stages, every single person - from design to engineering to marketing - knows exactly what their role is and how their work fits into the bigger picture. This prevents situations where marketing is promoting a feature that engineering has deprioritized.
- It Makes Things More Predictable: A lifecycle lets you set realistic timelines and budgets. That's absolutely critical for keeping stakeholders happy and investors confident. Instead of a vague "we'll be done when it's done," you can say, "We aim to complete the interactive prototype by Week 5."
- It Forces You to Focus on the Customer: Every stage should push you to get in front of your target users, making sure the thing you're building is genuinely something they want and need. This constant feedback loop is what transforms a good idea into a great product.
In short, the product development lifecycle swaps out guesswork for a strategic, evidence-driven process. It’s how you make sure you’re not just building a product, but building the right product for the right people.
The Core Phases of Development
While teams might use slightly different names for the product development lifecycle stages, the path is almost always the same. We're going to walk through each of these phases, from validating that initial spark of an idea to designing, building, and launching a product your customers will actually stick around for. This is your practical, step-by-step playbook for making your vision a reality.
Validating Your Idea Before You Build
Before a single line of code gets written, before a designer sketches a single screen, the most important work happens right here. This is the moment you figure out if you have a good idea or a good business. It’s all about stress-testing your assumptions to make sure you’re solving a problem so painful that people will gladly pay you to make it go away.
Too many founders fall in love with their solution. The successful ones fall in love with their customer’s problem.
The validation stage forces a crucial shift in focus - from "what can we build?" to "what do they desperately need?" Think of it as an evidence-gathering mission that saves you from burning months of time and hundreds of thousands of dollars on a beautiful product nobody actually wants.
Defining Your Target and Their Problem
The first step isn't building; it's understanding who you're building for.
Let's say you've got an idea for a fintech app to help freelancers with budgeting. Instead of just assuming they need another budgeting tool, you have to go deeper. This means creating a detailed user persona - not just a demographic profile, but the story of a real person with real struggles.
Your persona might be "Alex, a 32-year-old freelance graphic designer who can’t keep track of fluctuating income and dreads predicting quarterly tax payments." You need to get inside Alex's head and understand the day-to-day anxiety this causes.
With that persona in hand, you start conducting user interviews. Crucially, you're not there to pitch your idea; you're there to listen. Ask open-ended questions that get them talking:
- "Tell me about the biggest headache you face when managing your finances."
- "What are you using right now to handle this? What do you hate about it?"
- "If you could wave a magic wand and make one financial problem disappear, what would it be?"
This process is what turns a vague guess into a validated problem statement. You go from "freelancers need a budget app" to something much more potent: "Freelance creatives struggle to separate business and personal expenses, causing significant stress and costly errors during tax season." Feel the difference? One is an idea; the other is a painful, specific problem you can build a business on.
You can go much deeper on this in our guide on **how to validate your startup idea**.
Gathering Evidence and De-Risking Your Vision
Once you have a sharp, validated problem and a clear target user, it’s time for some recon. You need to dive into market and competitor analysis. Are there other solutions out out there? If so, what are their weaknesses? Maybe they're too clunky, too expensive, or built for small businesses instead of individual freelancers. That gap in the market is where you'll plant your flag.
For example, a competitor might offer robust invoicing but have a terrible mobile experience. Your actionable insight is to build a mobile-first solution that excels where they fail.
The table below outlines the core activities and their outcomes during this discovery work.
Key Activities and Deliverables in the Discovery Phase
This table summarizes the essential tasks that turn a raw idea into a validated, de-risked starting point for your product.
| Activity | Objective | Key Deliverable |
|---|---|---|
| User Persona Development | To create a detailed, empathetic profile of the ideal customer. | A 1-2 page document detailing the user's goals, pain points, and behaviors. |
| User Interviews | To gather qualitative data directly from the target audience about their problems. | Interview transcripts and a summary of key insights and direct quotes. |
| Problem Validation | To confirm the problem is real, significant, and worth solving. | A validated problem statement that is specific and actionable. |
| Market Analysis | To understand the market size, trends, and potential for the product. | A market research report with TAM/SAM/SOM estimates. |
| Competitor Analysis | To identify existing solutions and find gaps or weaknesses to exploit. | A competitive matrix comparing features, pricing, and positioning. |
| Lean Canvas | To distill the business model into a single, strategic document. | A completed Lean Canvas outlining the problem, solution, metrics, and channels. |
These activities aren't just checkboxes; they are foundational steps that ensure every subsequent decision is grounded in real-world evidence, not just founder optimism.
The goal of validation isn't to prove your idea is brilliant. The goal is to find every reason it might fail - and address those reasons before you have a payroll to meet and investors to answer to.
Ultimately, the key deliverable from this phase isn't code; it's confidence backed by data. This often takes the form of a Lean Canvas, a one-page business plan that maps out your problem, solution, key metrics, and customer segments. This document becomes the strategic bedrock for everything that follows, ensuring your entire project is aimed squarely at a genuine market need from day one.
Bringing Your Vision to Life with Design and Development
Once you’ve confirmed people actually want what you’re building, the game changes. We move from spreadsheets and interview notes to pixels and code. This is where your validated idea starts to become a real, tangible product. It’s a delicate dance between two crucial disciplines: design (how it looks and feels) and development (how it actually works).

Forget the old waterfall model where designers throw mockups over a wall to engineers. Modern product building is a tight, collaborative loop. Designers and developers work together in short cycles - often called sprints - to build and refine the product piece by piece. This agile rhythm ensures the final product isn’t just technically sound, but genuinely enjoyable to use.
From Wireframes to Interactive Prototypes
The design journey doesn't start with choosing a cool font or a trendy color palette. It starts with structure. The first step is creating low-fidelity wireframes, which are essentially the architectural blueprints for your app. Think simple, black-and-white sketches that show where buttons, text, and images will live on each screen.
This bare-bones approach lets the team focus on one thing: the user's journey. Is the flow logical? Is it intuitive? We answer those big questions before getting lost in the weeds of visual design.
With the core structure locked in, we move to high-fidelity design. This is where the magic happens. Using tools like Figma, designers breathe life into the wireframes, adding branding, typography, colors, and imagery to create pixel-perfect mockups.
But a picture is just a picture. The final design step is to stitch these mockups together into an interactive prototype. It's a clickable, tappable model that feels like the real app. Stakeholders and test users can navigate through it, giving critical feedback long before a single line of code gets written. For instance, you could give five target users a simple task, like "sign up and create your first invoice," and watch where they get stuck. This real-world test reveals usability flaws that static images can't.
This progression from rough sketch to clickable prototype is one of the most powerful de-risking tools in your arsenal. It lets you test and perfect the user experience for a fraction of the cost of making changes post-development.
The entire design phase is guided by two core principles:
- User Experience (UX) Design: The science of making a product effortless and satisfying. UX is all about the user's journey, ensuring every tap and swipe feels natural and efficient.
- User Interface (UI) Design: The art of making the product beautiful. UI covers all the aesthetic choices - from button shapes to color palettes - that build trust and delight the user.
Building a Robust and Scalable Product
With the interactive prototype as their North Star, the development team gets to work. For any startup, the choice of technology is a massive decision that impacts speed, cost, and scalability. Many choose a framework like React Native for a simple reason: it lets you build for both iOS and Android from a single codebase.
That's huge. Instead of funding and managing two separate teams, you have one streamlined process, cutting development time and costs dramatically.
While the frontend (what the user sees) is being built, the backend - the app's engine - is constructed in parallel. This involves setting up the servers, databases, and APIs that handle everything from user logins to processing data. If you plan to make money from day one, this is also where crucial third-party integrations come in:
- Payment APIs: A service like Stripe is integrated to handle credit card transactions and one-time payments securely.
- Subscription Management: Tools like RevenueCat simplify in-app purchases and subscriptions, managing the complexities of the Apple App Store and Google Play Store for you.
This whole build is managed with an agile workflow. Design and development aren't siloed stages; they're deeply intertwined. For startups, mastering how to weave **design in an agile methodology** is the secret to moving fast without breaking things. This rhythm ensures what gets built is a perfect match for the intended experience, paving the way for a launch that actually hits the mark.
From Launch to Growth: Turning Your Product into a Business
Getting your product into the hands of real users is a massive milestone. But the work isn't over. In fact, it’s just beginning. The launch isn't the finish line; it’s the starting line for growth. This is where you shift from building a thing to building a business.
A solid launch is built on a foundation of intense testing. Skip this, and you risk shipping a buggy product that frustrates your first, most valuable users and kills your reputation before you even get off the ground.
Quality Assurance: The Final Dress Rehearsal
Think of Quality Assurance (QA) as the final dress rehearsal before opening night. It’s a methodical process to hunt down and squash bugs, glitches, and anything that makes the experience feel clunky. Great QA isn’t just about making sure the app doesn’t crash; it’s about ensuring the entire user experience is smooth, intuitive, and feels solid.
This process has a few critical layers:
- Unit Testing: Developers test tiny, individual pieces of code to make sure each component works perfectly on its own. For example, testing that a "calculate tax" function returns the correct value.
- Integration Testing: This is where you check that all those individual components play nicely together as a complete system. For example, does the tax calculation work correctly when creating a full invoice?
- User Acceptance Testing (UAT): Real users get their hands on the product to confirm it actually solves their problem and works as they'd expect in the wild. You might give a beta tester a task: "Try to send an invoice to a client and mark it as paid."
QA isn't just about finding bugs. It's about validating that the product you built actually delivers on the promise you made to your customers. A smooth, bug-free experience is one of the fastest ways to build trust and get people talking.
The Product Launch Checklist
Once the product is rock-solid, you’re ready to launch. This isn’t just about flipping a switch. It requires a coordinated push from your product and marketing teams to make sure your product is not only available but also gets discovered by the right people.
Here’s a practical checklist to guide your launch:
- Nail Your App Store Listings: For mobile apps, this is your storefront. Double down on App Store Optimization (ASO) with a compelling title, a keyword-rich description, and killer screenshots that scream value.
- Coordinate the Marketing Push: Get your timing right. Your launch day efforts - emails to your waitlist, blog posts, social media announcements - should all hit at once to create that initial wave of excitement.
- Get Analytics and Monitoring Ready: Before a single person downloads your app, make sure tools like Mixpanel, Amplitude, or Google Analytics are plugged in and working. You need to see what users are doing from the very first session.
- Have a Support Plan: Be ready for the first flood of feedback, questions, and bug reports. Having a clear system for customer support shows those crucial early adopters that you're listening. An actionable insight is to create canned responses for common questions before you launch to handle the initial volume efficiently.
From Launch to Growth: The Optimization Loop
The real work in these final product development lifecycle stages starts after you launch. This is where you move from building a product to building a business. The focus shifts to digging into data, understanding what users are actually doing, and making smart decisions to fuel growth.
It all comes down to a simple loop: Measure, Learn, Iterate.
You start by tracking the key performance indicators (KPIs) that tell you if your product is healthy. These numbers tell the story of how people are actually using what you've built.
Key metrics to obsess over post-launch:
- User Retention: What percentage of users come back after one day? One week? One month? High retention is the single clearest sign you're onto something.
- Conversion Rate: What percentage of users are taking that key action, like starting a trial or making their first purchase?
- Monthly Recurring Revenue (MRR): For any subscription product, this is your north star. It's the ultimate measure of predictable, healthy growth.
For instance, maybe you see that only 40% of new users make it through your onboarding. By watching session recordings, you might find a step that's confusing everyone. You could then run an A/B test with a simpler design, measure if it boosts completion rates, and keep tweaking until it's frictionless. This data-driven mindset is also the foundation of a strong user acquisition strategy for mobile apps, because it ensures the users you pay to acquire actually stick around.
New tools are constantly emerging to speed up this cycle. According to research from Fortune Business Insights on generative AI in the software development lifecycle, the market for AI development tools is projected to explode from $341.3 million in 2023 to $2,833.9 million by 2030. This shows a massive shift toward AI-assisted coding, design, and testing.
This continuous loop - testing, launching, and optimizing - is what separates a product that makes a quick splash from a business that creates lasting value.
An Accelerated Product Development Roadmap
Knowing the individual stages is one thing, but seeing how they fit together in a real-world timeline is where strategy truly comes to life. A typical product journey can drag on for nearly two years, but a focused, agile approach can slash that timeline dramatically.
Industry surveys show the average product development slog takes about 22 months from the first sketch to launch day. But with modern approaches like Rapid Application Development (RAD), you don't have to wait that long. We've found it's entirely possible to go from kickoff to a production-ready app in just 10–20 weeks - a fraction of the industry average. This kind of speed hinges on having crystal-clear requirements, an experienced full-stack team, and performance-based incentives. You can dig deeper into these product development trends and timelines if you're curious.
Here’s what that compressed timeline actually looks like, broken down into four distinct, high-impact phases.
Phase 1: Weeks 1-3 (Discovery and Validation)
The first three weeks are make-or-break. This isn't about writing code; it's about de-risking the entire project before a single dollar is spent on development. It's all about listening, learning, and validating your core assumptions.
- Key Activities: We dive deep into user interviews, run a thorough competitor analysis, and map out the core user journey. The only goal here is to prove you’re solving a painful, urgent problem for a real audience.
- Primary Deliverable: A completed Lean Canvas and a validated problem statement. This becomes the North Star for the entire build.
- KPI Focus: The key metric here is qualitative: problem validation. Success isn’t a number; it’s the unshakable confidence, backed by user evidence, that you're building the right thing.
Phase 2: Weeks 4-5 (Design and Prototyping)
With a validated problem in hand, we shift gears to designing a solution that feels intuitive and elegant. This is where we translate all those strategic insights into a tangible user experience that we can test and tweak before the heavy lifting of development begins.
We start with low-fidelity wireframes to map out the product’s skeleton, then move to high-fidelity, interactive prototypes using a tool like Figma. This lets everyone click through the app and get a real feel for the user experience.
- Key Activities: Wireframing the core user flow, building out the visual UI design system, and creating a clickable prototype.
- Primary Deliverable: An interactive prototype that looks and feels just like the final product.
- KPI Focus: The main goal is usability validation. We measure success based on user feedback - is the prototype clear? Is it easy to use?
Phase 3: Weeks 6-16 (Development Sprints)
This is the longest stretch, where the validated design is brought to life as a fully functional product. We break development into two-week sprints, which allows for steady progress, regular feedback, and the agility to adapt as we go.
By building in short, iterative cycles, the team can deliver functional pieces of the product early and often. This agile approach prevents costly surprises and ensures the final product aligns perfectly with the validated design.
During this phase, the team builds the front end, develops the back end, and integrates critical services for things like payments with Stripe or subscription management with RevenueCat.
Phase 4: Weeks 17-20 (Testing, Launch, and Optimization)
The final month is all about sticking the landing. It’s dedicated to ensuring a high-quality launch and setting the stage for growth. We conduct rigorous Quality Assurance (QA) testing to hunt down and squash any bugs, ensuring a buttery-smooth user experience from day one.
The timeline below shows how these final, crucial steps turn a developed product into a growing business.
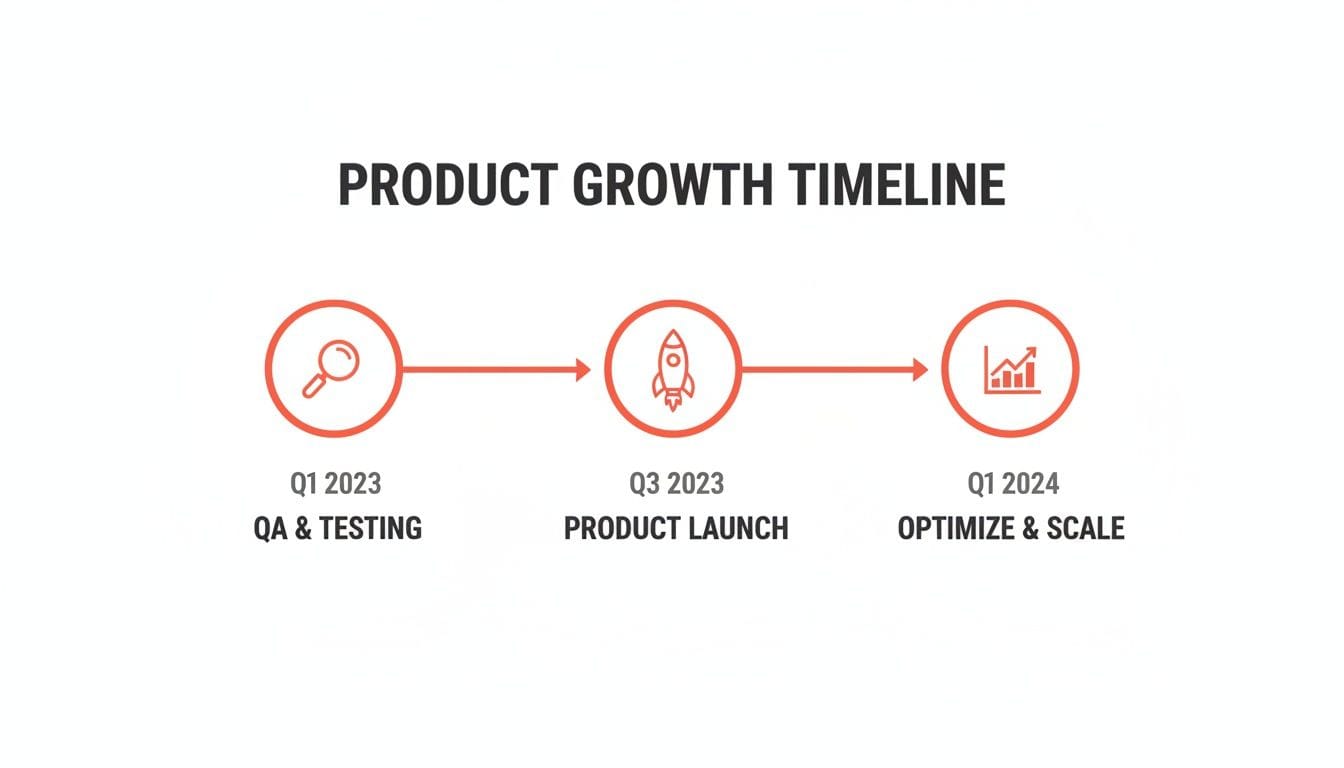
As you can see, once the core build is done, the focus immediately shifts from creation to validation and growth. QA, launch, and optimization become a continuous, repeating cycle.
- Key Activities: Comprehensive QA testing, App Store submission and optimization, and setting up analytics dashboards to track what matters.
- Primary Deliverable: A live, market-ready mobile app available on the App Store and Google Play.
- KPI Focus: The second you launch, the focus snaps to hard numbers: user retention, conversion rates, and Monthly Recurring Revenue (MRR). These metrics tell you the unfiltered truth about whether you've truly found product-market fit.
Below is a table summarizing what this entire accelerated process looks like from a high level.
Sample 20-Week Accelerated Development Roadmap
This timeline provides a clear example of how a startup can move from a kickoff meeting to a revenue-ready mobile app in under five months. The key is a relentless focus on core milestones and the KPIs that actually drive the business forward.
| Phase (Weeks) | Key Activities | Primary Deliverable | KPI Focus |
|---|---|---|---|
| Weeks 1–3: Discovery | User interviews, competitor analysis, journey mapping | Validated Problem & Lean Canvas | Problem Validation (Qualitative) |
| Weeks 4–5: Design | Wireframing, UI design, prototyping | Interactive Figma Prototype | Usability Validation |
| Weeks 6–16: Development | Sprints, front/back end build, integrations | Functional MVP Codebase | Velocity & Sprint Completion |
| Weeks 17–20: Launch | QA testing, app store submission, analytics setup | Live Mobile App | Retention, Conversion, MRR |
This roadmap isn't just about building faster; it's about building smarter. By tying every activity back to a critical deliverable and a core business KPI, you ensure that every week of work moves you closer to a product that customers not only use but are happy to pay for.
Planning for Long-Term Success and Handoff
Launching your product isn’t the finish line; it’s the start of the next race. Too many teams treat the launch day like a final exam, but it’s actually the first day of a new job. This stage is all about the handoff - transitioning the product from its build team to a state of sustainable, long-term ownership.
Whether you worked with an outside agency or an internal launch squad, a structured handoff is non-negotiable. This is how you make sure the institutional knowledge doesn’t just walk out the door when the project wraps. It’s about empowering your permanent team to own, maintain, and scale what you’ve all worked so hard to create.
Building Your Foundation for Ownership
The first step in any solid transition is creating a library of documentation. Think of it as the product's official owner's manual. Without it, your future team is flying blind, burning precious time reverse-engineering decisions that were made months ago.
This documentation can't be an afterthought; it needs to be comprehensive and easy for anyone to pick up.
- Codebase and API Documentation: This is the technical blueprint. It needs to cover the architecture, key dependencies, and provide dead-simple instructions for getting a new developer’s environment set up. An actionable tip is to include a "Getting Started in 30 Minutes" guide for new engineers.
- Knowledge Transfer Sessions: Get the builders and the new owners in a room. Walk through the codebase, the infrastructure, and the deployment process. Record every single one of these sessions - they’ll be invaluable down the road.
- Operational Plan: Create a clear runbook. What happens when the site goes down at 2 a.m.? How are user support tickets handled? This document should outline the exact procedures for common operational tasks, including contact information and escalation paths.
A great handoff isn't a single event; it's a process of gradually transferring knowledge and responsibility. The goal is to make the original development team redundant, empowering the new owners with the confidence and tools to succeed independently.
Assembling Your In-House Team
Once the product is live and you're getting real feedback, it's time to build the team that will carry it forward. You don't need to hire a ten-person army on day one. Instead, focus on a couple of key roles that will provide immediate value and set the stage for future growth.
For most products just starting out, the first two hires are the most critical:
- Product Manager: This person becomes the new steward of the product vision. They'll own the roadmap, ruthlessly prioritize the feature backlog based on what users are telling you, and make sure every line of code aligns with the core strategy.
- Lead Engineer: This is your technical owner. They're responsible for keeping the codebase healthy, managing infrastructure, and either building new features themselves or, as you grow, leading a small team of developers.
These first two hires form the nucleus of your long-term product organization. This approach reframes the "end" of the build as a strategic beginning, setting your company up for a future of innovation and growth.
Common Questions from Founders
Navigating the product lifecycle can feel like charting unknown territory. Over the years, I've heard the same questions pop up again and again from founders and product leaders. Let's clear up a few of the most critical ones.
What’s the single biggest mistake people make?
Hands down, the most common - and most expensive - mistake is rushing or completely skipping the validation stage.
Founders fall in love with their idea and jump straight into building, convinced they know what the market wants. But they haven't actually confirmed that they're solving a real, painful problem for a specific group of people. This almost always leads to burning through cash and time on a product nobody actually needs.
Proper validation isn’t just a nice-to-have. It’s the foundation that prevents you from building the wrong thing and having to make costly pivots six months down the line.
How long should this whole process take?
The honest answer? It varies. A complex B2B platform will take longer than a simple consumer app. But if your timeline is stretching beyond 12+ months just to get to a first version, that’s usually a red flag, especially for a startup that needs to show traction fast.
A dedicated, experienced team that's relentlessly focused on a Minimum Viable Product (MVP) can often get from a raw idea to a market launch in 4-6 months. The trick is to be merciless with your feature list - build only what’s absolutely essential to solve the core problem, launch it, and then let real user feedback guide what you build next.
Which KPIs should I be tracking at each stage?
Your Key Performance Indicators (KPIs) need to change as your product grows. Tracking the right thing at the right time is how you know if you’re on the right path or just spinning your wheels.
Here’s a simple breakdown:
- Early Validation Stage: Forget revenue for a moment. Your goal is to confirm interest. Track qualitative feedback from user interviews or metrics like the number of people who sign up for your waitlist. A practical goal could be getting 500 email sign-ups on a simple landing page that explains your value proposition.
- Launch Stage: Now, it's all about engagement. Your focus should be on Daily Active Users (DAU) and, more importantly, Day 7 and Day 30 retention. If people are sticking around, you’ve built something valuable. High retention is the clearest signal of product-market fit.
- Growth Stage: This is when you start focusing on the business metrics. Your dashboard should be highlighting Conversion Rates, Customer Lifetime Value (LTV), and Monthly Recurring Revenue (MRR). These are the numbers that prove you have a sustainable business, not just a cool product.
Ready to turn your validated idea into a revenue-generating mobile app in weeks, not years? At Vermillion, we specialize in an accelerated, performance-based approach that ties every stage of development to your business goals. Learn how we help startups launch faster and smarter.
Keep reading
See all →
March 22, 2026
Unlocking Revenue Your Guide to Price Tier Strategy
March 21, 2026
Your Guide to Flawless Stripe Subscription Management

May 14, 2026
Fractional Mobile Engineering vs. Full-Time Hiring in 2026
The mobile engineering talent market has shifted dramatically over the past two years. Budgets are tighter, AI tools have changed what a sin...
March 20, 2026
Recurring Billing With Stripe a Guide for Subscription Apps
Master recurring billing with Stripe. This guide covers everything from setup and server logic to webhooks and churn reduction for subscript...
March 19, 2026
Unlocking Growth with Mobile App Retention Metrics
Discover the mobile app retention metrics that directly fuel MRR growth. This founder's guide offers actionable strategies to track, analyze...