Getting Started with React Native A Startup's Guide to Building Apps
For a startup, picking React Native isn't just a technical move—it's a core business strategy. The appeal is brutally simple: build your app with JavaScript once, and deploy it on both iOS and Android. This isn't just about convenience; it's about radically cutting down development time and costs, which means you can get your idea in front of customers that much faster.
Why Smart Startups Bet on React Native

When your runway is finite, speed and efficiency are everything. React Native's "learn once, write anywhere" philosophy is a game-changer. It means a single, focused development team can own both platforms. This unified approach doesn't just get you to market faster—it makes maintaining and updating the app post-launch infinitely simpler.
Practical Insight: Imagine you need to fix a critical bug in your user authentication flow. With two native codebases, you'd have an iOS developer fixing it in Swift and an Android developer fixing the exact same logic in Kotlin, doubling the work and coordination. With React Native, one developer fixes it once in JavaScript, and the patch is deployed to both stores simultaneously.
Think about it. Instead of wrestling with two entirely separate codebases in Swift and Kotlin, your team is laser-focused on one. That directly translates to a smarter use of your most precious resources: capital and developer hours. You get to spend that saved time and money on building a product people actually want to use.
Proven Success at Scale
Don't mistake this for a small-fry framework. It’s been battle-tested by some of the biggest names in tech. Companies like Shopify, Discord, and Pinterest didn't just build MVPs with React Native; they scaled them to massive user bases. They proved that sharing a codebase doesn't mean you have to sacrifice quality or performance.
The real power of React Native for a startup is its ability to shrink the gap between idea and revenue. You're not just saving on initial development; you're creating a more agile and sustainable foundation for growth.
A Thriving Ecosystem
The framework's massive popularity means you're never building in a vacuum. You’re tapping into a huge, supportive community that has already solved most of the common problems you'll face.
This widespread adoption is reflected in real market numbers. The global React Native app development market was valued at USD 325 million in 2024 and is projected to explode to USD 499 million by 2031. With over 25,116 companies already using it, you gain access to a rich ecosystem of tools, libraries, and experienced talent.
Practical Insight: Need to add QR code scanning to your app for event check-ins? Instead of building it from scratch, you can use a well-vetted library like react-native-camera. This saves you weeks of development time and lets you benefit from the collective experience of thousands of other developers who have already stress-tested the solution. For a deeper dive into how it stacks up against the old-school approach, check out our guide on React Native vs native development.
Choosing Your Path: Expo Go vs. Bare Workflow
Alright, your first big fork in the road with React Native is choosing between the Expo Go (managed) workflow and the Bare workflow. This isn't just some technical jargon to gloss over. This decision directly impacts how fast you can build, what features you can access, and how much control you have down the line.
Getting this right from the start saves you from a world of headaches later on.
I like to think of it this way: choosing Expo Go is like buying a fully-equipped RV. It has the engine, the kitchen, the beds—everything you need to just grab the keys and hit the road. The Bare workflow, on the other hand, is like buying a powerful van chassis. You get the engine and the frame, but you're responsible for building out the entire interior yourself, piece by piece.
When to Go All-In on Expo Go
For most startups focused on building a Minimum Viable Product (MVP), Expo Go is the undisputed champion. It’s a managed environment that completely hides the messy parts of native iOS and Android configuration. Forget about wrestling with Xcode or Android Studio. You can get a "Hello World" app up and running on your actual phone in less than five minutes.
Actionable Insight: To see this speed in action, run these commands in your terminal:
npx create-expo-app MyFirstAppcd MyFirstAppnpx expo start
Scan the QR code with the Expo Go app on your phone. You'll see your live app running. This rapid feedback loop is invaluable for quick prototyping and validating your core idea.
Expo Go is your secret weapon for speed. It lets you sidestep the native code rabbit hole and focus on the one thing that matters: getting a working product in front of users to see if your assumptions are right.
Choose Expo Go when:
- Your number one goal is speed-to-market for an MVP.
- Your app doesn't need any niche custom native modules (like connecting to specialized Bluetooth hardware or running unique background tasks).
- You want to make the build and testing process dead simple for your entire team.
When the Bare Workflow Is a Must
As powerful as Expo is, it has its limits. The Bare workflow is your ticket to total control. It sets you up with standard, native iOS and Android projects, which is absolutely essential when you need to integrate custom native code that isn't part of the Expo SDK. You get direct access to the metal, allowing for deep, OS-level integrations that just aren't possible otherwise.
You have to choose the Bare workflow if your app requires:
- Custom Payment Integrations: While services like Stripe have great Expo-compatible libraries, direct integrations with specific, regional payment gateways often demand native code.
- Specialized Hardware Access: Think connecting to a proprietary medical device via Bluetooth Low Energy or tapping into obscure device sensors.
- Deep OS Features: If you need to perform unique background processing or hook into platform-specific APIs that Expo doesn't cover, you'll need that native control.
To help you make the call, here's a quick breakdown of how these two paths stack up for a startup.
Expo Go vs Bare Workflow Key Differences for Startups
| Factor | Expo Go (Managed Workflow) | Bare Workflow |
|---|---|---|
| **Speed to MVP** | **Extremely Fast.** You can deploy to a device in minutes. Ideal for rapid prototyping. | **Slower.** Requires manual setup of Xcode and Android Studio projects. |
| **Ease of Use** | **Very High.** Abstracts away almost all native configuration. Great for web developers. | **Lower.** You are responsible for managing native dependencies and build settings. |
| **Native Module Access** | **Limited.** You can only use modules included in the Expo SDK or those with config plugins. | **Unlimited.** Full access to the entire native ecosystem. If a native library exists, you can use it. |
| **App Size** | **Larger.** Includes the entire Expo SDK, even parts you don't use. | **Smaller.** You only include the native libraries your app specifically needs. |
| **Long-Term Flexibility** | **Moderate.** You can "eject" to a bare project, but it's a one-way street. | **Maximum.** Total control over your app's native code and dependencies from day one. |
| **Best For** | Startups validating an idea, MVPs, apps without complex hardware needs. | Apps requiring custom native modules, deep OS integrations, or long-term granular control. |
Ultimately, your choice boils down to your product roadmap. Are you prioritizing speed and validation, or do you know for a fact you'll need that low-level control? For a broader perspective on the ecosystem you're stepping into, check out this guide on what cross-platform app development entails.
Remember, while you can always "eject" from an Expo project to a bare one later, it's a permanent move. Choosing wisely now will save you a ton of time and effort down the road.
Assembling a Production-Ready Tech Stack
Choosing a few libraries might seem trivial, but the right combination builds a foundation that won't crumble as your startup scales. Get this right from day one, and you'll save yourself from months of painful refactors and soul-crushing technical debt down the road.
This isn't just a list of popular tools; it's a battle-tested blueprint for a performant and maintainable React Native app.
The best part about building with React Native is that you’re not alone. You're tapping into a massive, active ecosystem. The core React package, which powers the whole show, pulls in over 20 million weekly downloads as of September 2024. For context, that absolutely dwarfs competitors like Angular (2.7 million) and Vue.js (4.3 million).
This means you’ll always find well-maintained libraries, answers on Stack Overflow, and a huge community to back you up. We're talking long-term stability here—a framework with this much momentum guarantees you'll have support, security updates, and a steady stream of talent for years to come. You can discover more insights about the React development market if you want to dig deeper.
This chart from NPM Trends really puts it in perspective:
Core Stack Components
Our go-to stack prioritizes developer experience, performance, and the ability to scale—three things that are absolutely critical in a startup environment where you need to move fast without breaking everything.
- Language: TypeScript
This one is non-negotiable for any serious project. TypeScript adds static typing to JavaScript, which is a fancy way of saying it catches your dumb mistakes during development instead of letting them crash your app in front of a user. As your team grows, its self-documenting nature makes bringing new engineers on board infinitely easier.
- Navigation: React Navigation
Building intuitive user flows is the difference between an app people love and an app people delete. React Navigation is the undisputed community standard. It’s powerful enough to handle anything from a simple stack of screens to complex nested tab bars and drawers, and its declarative API just feels right inside a React app.
- State Management: Zustand or Redux Toolkit
Managing your app's state can get chaotic, fast. For most startups, Zustand is a brilliant choice. It’s lightweight, has almost no boilerplate, and uses a simple hook-based API that’s a joy to work with. If you find yourself dealing with incredibly complex, global state, Redux Toolkit is still the heavyweight champ. It tames the complexity of classic Redux into something manageable and scalable.
- Data Fetching & Caching: TanStack Query (React Query)
This library will completely change how you think about talking to your backend. TanStack Query (formerly React Query) handles all the messy parts of data fetching for you—caching, background refetching, and managing stale data—making your app feel snappy and responsive with minimal effort. It lets you rip out all those messy useEffect hooks and replace them with clean, declarative code.
A Practical Look at How It All Fits
Let's make this real. Imagine you're building a social feed where users scroll through posts. Here’s a quick look at how you'd fetch that data using our recommended stack.
import React from 'react';
import { View, Text, FlatList, ActivityIndicator } from 'react-native';
import { useQuery } from '@tanstack/react-query';

// Define the type for a single post
interface Post {
  id: number;
  title: string;
  body: string;
}

// The API fetching function
const fetchPosts = async (): Promise<Post[]> => {
  const response = await fetch('https://api.example.com/posts');
  if (!response.ok) {
    throw new Error('Network response was not ok');
  }
  return response.json();
};

export const PostFeed = () => {
  const { data, error, isLoading } = useQuery<Post[], Error>({
    queryKey: ['posts'],
    queryFn: fetchPosts,
  });

  if (isLoading) {
    return <ActivityIndicator size="large" />;
  }

  if (error) {
    return <Text>Error: {error.message}</Text>;
  }

  return (
    <FlatList
      data={data}
      keyExtractor={(item) => item.id.toString()}
      renderItem={({ item }) => (
        <View style={{ padding: 16, borderBottomWidth: 1, borderBottomColor: '#ccc' }}>
          <Text style={{ fontWeight: 'bold' }}>{item.title}</Text>
        </View>
      )}
    />
  );
};
This is where the magic happens. TypeScript gives us type safety for our Post data, so we know exactly what we're working with. Then, TanStack Query steps in and handles all the loading and error states with just a single hook. The result is clean, scalable code that lets you focus on building features, not writing boilerplate.Integrating Monetization and Growth Tools From Day One
An app without a growth engine is just a project. If you want to succeed, you need to shift your focus from just writing code to building a product engineered for commerce and user engagement right from the very start.
Planning for monetization isn't something you tack on later; it's a foundational piece of your strategy when you're just getting started with React Native.
Simplify In-App Purchases with RevenueCat
Implementing in-app purchases and subscriptions can feel like a nightmare. Apple and Google have notoriously complex payment APIs that can bog down your development team for weeks, sucking up precious time and money.
This is where a third-party service becomes a startup's best friend.
A tool like **RevenueCat** is an absolute game-changer. It wraps around the native StoreKit (iOS) and Google Play Billing APIs, giving you a single, clean SDK to manage subscriptions, one-time purchases, and user entitlements across both platforms.
Instead of wrestling with platform-specific code, you can stand up a full subscription system in just a few days. That frees up your engineers to focus on what they do best: building core features, not payment infrastructure. For a deeper look at the strategy behind this, check out our detailed guide on how to monetize a mobile app.
Understand Your Users with Analytics
You can't grow what you don't measure. Integrating analytics from day one is completely non-negotiable for tracking your Key Performance Indicators (KPIs) like user retention and conversion rates.
Tools like **Mixpanel or Segment** are excellent choices here. They let you see exactly what users are doing inside your app, where they get stuck, and what features they love.
Here’s a practical code example of tracking a critical user event with Mixpanel:
import { Mixpanel } from 'mixpanel-react-native';

// Initialize Mixpanel once in your app's entry point
const mixpanel = new Mixpanel("YOUR_PROJECT_TOKEN");
mixpanel.init();

// A function you might call from a "Start Trial" button's onPress handler
export const trackTrialStarted = (planType) => {
  // Track when a user starts their free trial
  mixpanel.track('Trial Started', { 'Plan Type': planType });
  console.log(`Event 'Trial Started' sent for plan: ${planType}`);
};
This one simple event gives you a clear signal of user intent. It helps you measure how effective your onboarding flow is at converting curious users into potential customers.
Drive Engagement and Test Ideas Safely
Growth isn't just about acquisition; it's about getting people to stick around.
Push notifications are a powerful tool for bringing users back. A service like **OneSignal** makes implementing them incredibly straightforward in React Native. You can send targeted messages based on user behavior, like reminding someone about an item they left in their cart.
Finally, you need a way to test new features without risking your entire user experience. This is where feature flags from a service like **LaunchDarkly are essential. They let you roll out a new feature to a tiny segment of users—say, 5%** of your audience—to see how it performs before you bet the farm and release it to everyone.
By integrating these tools early, you're not just building an app; you're building a business. You create the feedback loops that let you understand user behavior, validate ideas quickly, and connect your product directly to revenue.
To accelerate your digital presence and attract those crucial early users, it's also worth adopting advanced tactics for your brand's online content, like mastering AI for SEO content strategy. This playbook helps ensure your app is built for growth from the ground up.
Your 10-Week Roadmap from Code to App Store
A great idea is just the starting point. Turning that idea into a polished, launch-ready app that people will actually pay for demands a structured plan. This pragmatic 10-week roadmap isn't theoretical; it mirrors the exact process we use to take a React Native app from a rough concept to a live product on both the App Store and Google Play.
Think of this less as a schedule and more as a battle plan. It's designed to build momentum and ensure you're focused on the right things at the right time.
Weeks 1-2: Discovery and Foundations
The first two weeks are all about strategy, not code. Seriously, don't write a single line until this is done. This is where you finalize your core feature set, get brutally honest about who your target user is, and map out your monetization strategy.
Actionable Insight: Your key deliverable for this phase should be a simple product requirements document (PRD) outlining the MVP's user stories. For example: "As a new user, I can sign up with my email and password," and "As a logged-in user, I can view my dashboard." This document becomes your North Star for development.
Critically, you’ll also make the big technical calls: choosing between Expo and the Bare workflow and locking in that production-ready tech stack we talked about earlier.
Weeks 3-6: Core Feature Development
With a solid blueprint in hand, your development team can finally hit the ground running. These four weeks are dedicated to building the heart of your application—the core features that solve your user's number one problem.
The focus here is on clean, scalable code. This means implementing navigation with React Navigation, setting up state management (we're big fans of Zustand for this), and actually building the screens and logic that make your app useful.
Practical Example: By the end of week 4, your login, registration, and main dashboard screens should be fully functional, pulling data from a staging API. This allows you to start internal testing and get early feedback on the core user flow while other features are still in development.
Weeks 7-8: Integration and Automation
Now it's time to build the growth engine. In these two weeks, you'll integrate the tools that turn your app from a project into a business. This is where you wire up in-app purchases with RevenueCat, set up event tracking with a tool like Mixpanel, and add push notifications via OneSignal.
At the same time, your engineers should be setting up a CI/CD (Continuous Integration/Continuous Deployment) pipeline using a service like GitHub Actions or Codemagic. This automates the build and deployment process, which is absolutely essential for shipping updates quickly and reliably. You can read more about this in our an end-to-end guide on creating a React Native app from idea to launch.
The following timeline shows how these tools fit together to turn your app into a product that can actually grow.
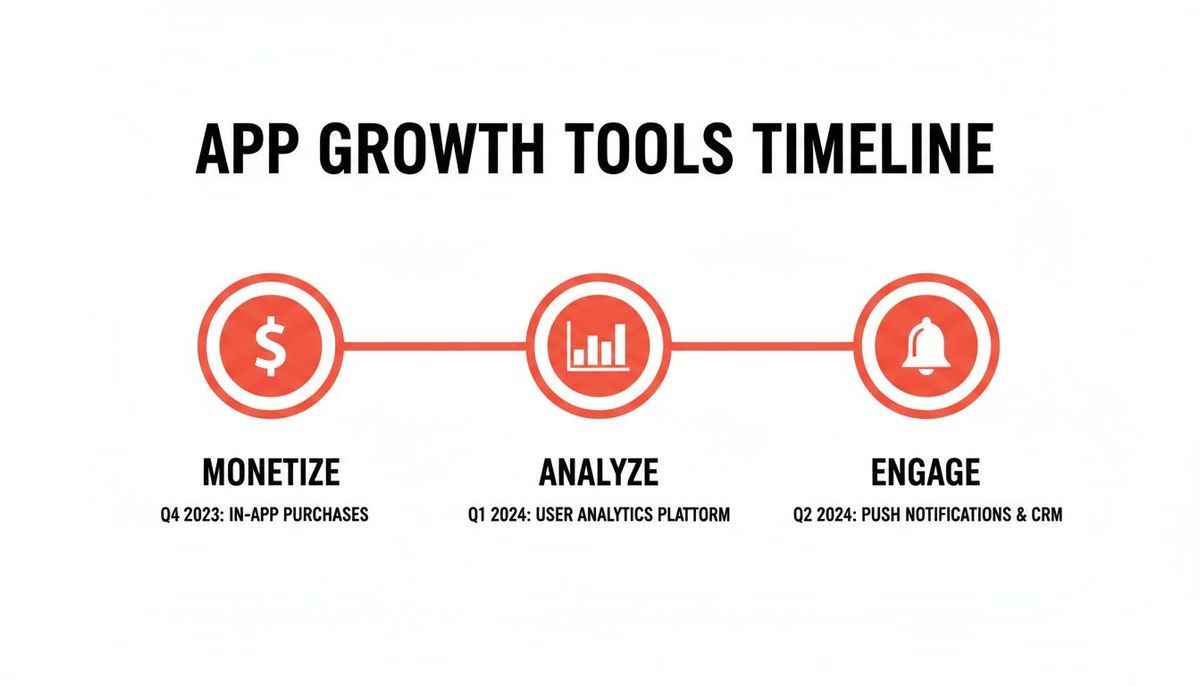
This visual really drives home the phased approach: start with monetization, then add analytics to understand your users, and finish with tools to keep them engaged.
Weeks 9-10: Testing and Launch
The final stretch is all about polish and preparation. Your team will conduct rigorous QA testing to squash bugs and smooth out any rough edges in the user experience.
You'll also run beta tests with real users through Apple's TestFlight and the Google Play Console's internal testing tracks. This isn't optional; it's where you gather the raw, unfiltered feedback that makes the difference between a good launch and a great one.
Actionable Insight: Create a simple feedback form for your beta testers using a tool like Google Forms. Ask pointed questions: "What was the most confusing part of the app?" and "What one feature is missing that would make you use this daily?" This structured feedback is far more valuable than vague comments.
The last few days are all about perfecting your app store listings—crafting a compelling description, creating eye-catching screenshots, and finalizing your privacy policy. After one last review, you hit "submit" and prepare for launch.
This roadmap is aggressive but completely realistic. Sticking to a disciplined schedule like this is how you turn an idea into a revenue-generating asset in under a single quarter.
Questions We Hear All the Time
When you're deep in the trenches, theory goes out the window. It’s all about solving the real, practical problems standing between you and a production-ready app. Here are the straight-up answers to the questions that come up again and again from founders and developers we work with.
How Does React Native Performance Actually Compare to Native?
Honestly, for 95% of apps out there, your users will never, ever be able to tell the difference.
That’s because React Native isn’t a web view masquerading as an app. It renders using the very same native UI building blocks as an app built in Swift or Kotlin. The result is a genuinely native look and feel.
Actionable Insight: A common performance bottleneck is rendering large lists. To ensure a smooth scrolling experience, always use React Native's FlatList component. It virtualizes the list, meaning it only renders the items currently visible on screen (plus a few more as a buffer), which keeps memory usage low and the UI responsive, even with thousands of items.
When performance issues do pop up, it’s almost always because of something fixable in your own code—like unoptimized JavaScript, massive image files, or sloppy data fetching. It’s rarely the framework’s fault. Unless you're building a high-fidelity 3D game, React Native has more than enough horsepower.
Can I Add Custom Native Code to My Project Later?
Absolutely. This is one of React Native’s biggest strengths and a huge safety net for startups.
If you start with the bare workflow, you have day-one access to the native layer. You can drop in and write custom modules in Swift, Objective-C, Kotlin, or Java whenever you need to. This is perfect for tapping into specific device APIs, integrating a niche third-party SDK, or offloading a computationally heavy task for a performance boost.
But what if you start with Expo's managed workflow to move faster? You’re still not locked in. You can always eject down the road. Ejecting converts your project into a standard native one, giving you that same deep level of control. It’s the best of both worlds: move fast to build your MVP, then go deep on native integrations as your product matures.
What Are the Most Common Mistakes Startups Make with React Native?
The mistakes that kill momentum are usually strategic, not technical. We see the same patterns pop up all the time.
A classic one is choosing the bare workflow too early. Founders think they need ultimate flexibility from day one, but in reality, Expo Go would have let them iterate on their MVP twice as fast. They trade speed for a level of control they don’t even need yet, losing precious time.
Another frequent misstep is putting off state management. Without a solid tool like Zustand or Redux Toolkit in place early, the app's data flow descends into chaos. It becomes a tangled mess of props and callbacks that’s a nightmare to debug and maintain.
And finally, too many teams skimp on setting up a real CI/CD pipeline. It feels faster to handle testing and deployment manually at first, but that "shortcut" quickly becomes the single biggest bottleneck in your entire development process. You end up shipping slower and with more bugs.
How Much Does It Really Cost to Build a React Native App?
The final number obviously depends on complexity, but the main financial win with React Native is raw efficiency.
Building one app for two platforms from a single codebase can slash your overall development costs by 30-40% compared to the old way of building two completely separate native apps. That’s a huge deal for a startup’s runway.
For a funded startup looking to build a robust MVP—we’re talking user accounts, a real backend, payments, the works—the investment typically lands in the $150K to $750K range. This isn't just for code; it covers the whole nine yards from strategy and design through a successful launch. You’re building a real product aimed at hitting your business goals, not just a proof of concept.
Ready to build a revenue-generating app that proves traction and delivers ROI? At Vermillion, we partner with funded startups to deliver production-ready React Native apps in as little as 10-20 weeks. Let's build your success story together.